

What is Deployment?
Deployment in Kubernetes is a way to manage and control the deployment of our applications. It ensures that a specified number of replicas, of our application are running and handles updates and scaling. It works on changing the present state into your desired state. In simple terms, a Kubernetes deployment manages the performance of the pod.
Now the question is when we can deploy our application with pods then why do we need deployment?
Why deployment?
As we now know, a pod is the smallest unit of Kubernetes used to house one or more containers and run applications in a cluster but in real-world use cases, you want your deployments to stay up and running automatically and remain healthy without any manual intervention.
It is highly recommended that you never Deploy applications as pods but instead deploy applications as deployments because it watches for failed pods and will start up new pods as required to maintain the specified number.
In case, If you don’t want a Deployment to monitor your pod you can create a pod directly with the create command.
Pods Vs Deployment
Pods -
runs one or more closely related containers
Not suitable for production
No rolling updates
No auto-healing and auto-scaling
Deployment -
You can rollout and rollback your changes using deployment
Supports rolling updates
Best suitable for production
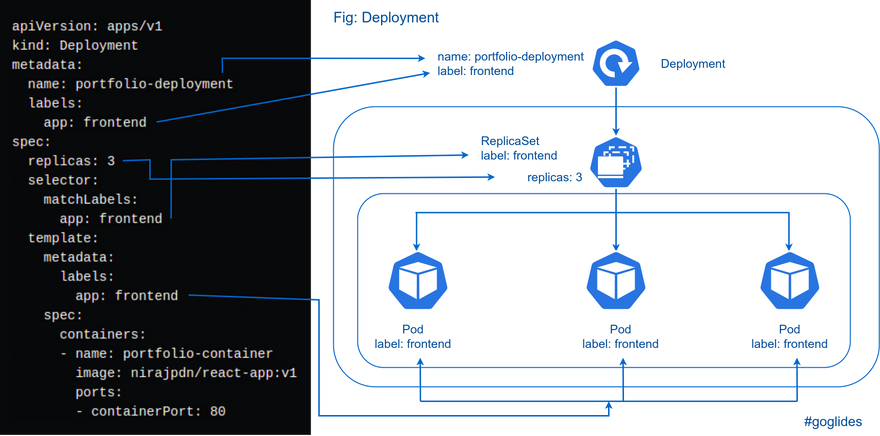
The key components of a Deployment file include
apiVersion: apps/v1
kind: Deployment
metadata:
name: my-deployment
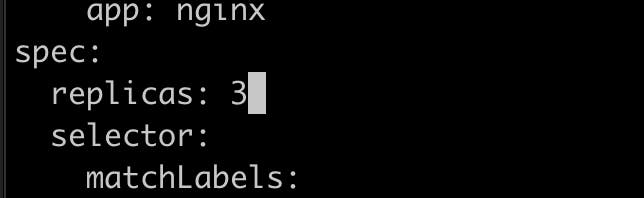
spec:
replicas: 3
selector:
matchLabels:
app: myapp
template:
metadata:
labels:
app: myapp
spec:
containers:
- name: my-container
image: nginx:latest
ports:
- containerPort: 80
apiVersion: specify the Kubernetes API version used.
kind: Specifies the type of Kubernetes resource there are various resource like deployment, ingress, service etc.
metadata: Provides information about the Deployment, such as its name, labels, and annotations.
spec: Describes the desired state of the Deployment
ReplicaSet- Monitors the Desired state of each pod and Auto-healing and auto-scaling
Labels and Selectors -
In deployment, we have 3 replicas of the pod but due to some reason one of the pod goes down and we have an auto-healing feature that parallelly creates a new pod
Now the problem is that when this new pod come up it has a different IP address than the previous pod.
To overcome this problem we will access the application with labels and selectors

example of deployment file
How to create a Kubernetes Deployment?
Prerequisites -
Kubectl Installed
Kubernetes Cluster
First start the minikube cluster
minikube startLet's suppose you have a pod running in your cluster for some reason the pod accidentally got deleted because of any reason then the customer who is trying to access the application will not have any access to the application.
To overcome this issue you should create deployment
To create deployment first you need to create deployment yaml file
  apiVersion: apps/v1
  kind: Deployment
  metadata:
    name: nginx-deployment
    labels:
      app: nginx
  spec:
    replicas: 1
    selector:
      matchLabels:
        app: nginx
    template:
      metadata:
        labels:
          app: nginx
      spec:
        containers:
        - name: nginx
          image: nginx:1.14.2
          ports:
          - containerPort: 80
After putting this thing in deployment.yaml file now just execute
kubectl apply -f deployment.yaml
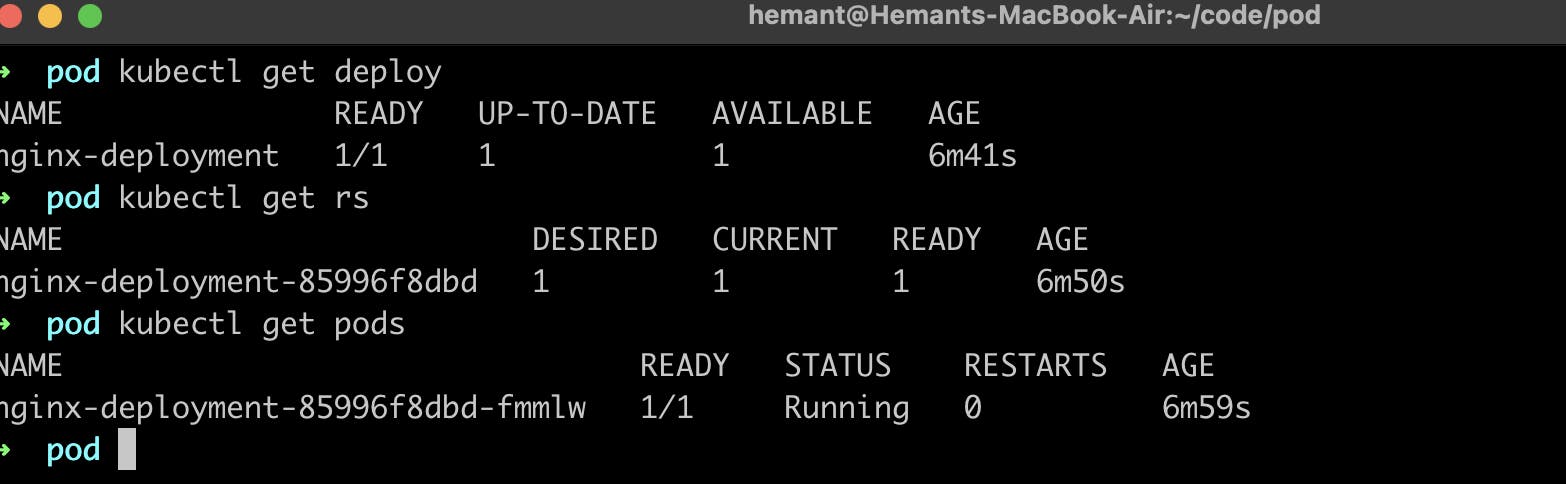
Now when you create a deployment.yaml the pod will also create you can check by executing this command
kubectl get pods
So, once you create a deployment it will create a replicaSet and replica will create pod
In deployment the desired number of replica has to be available in the cluster , lets say i have deletes a pod then it will immediately create a new pod
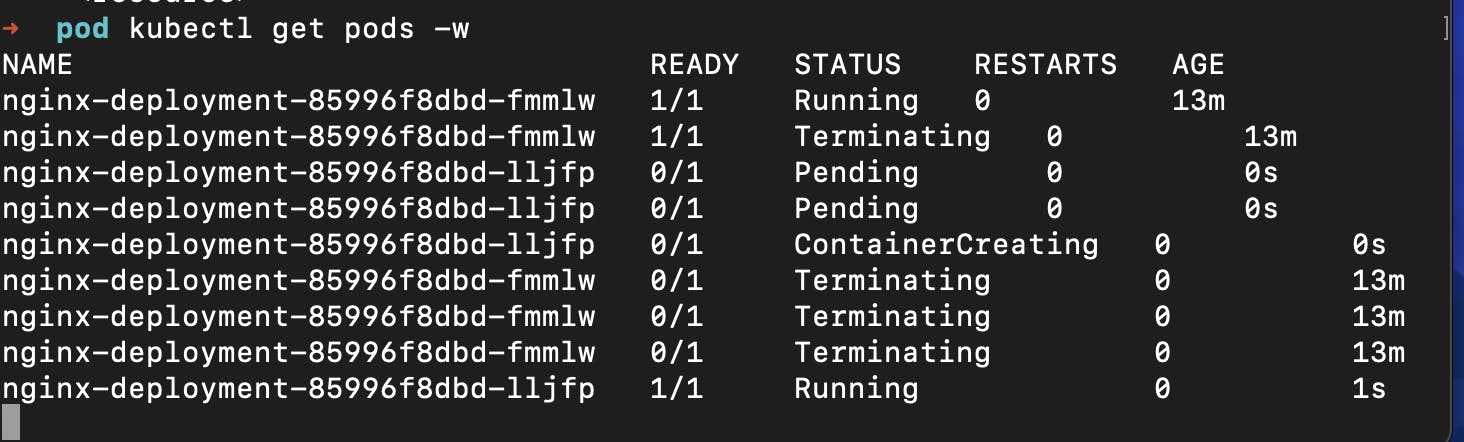
You can also increase the pod counts by changing the replica from 1 to 3
when you apply the changes then you can see that now there are three pods are running
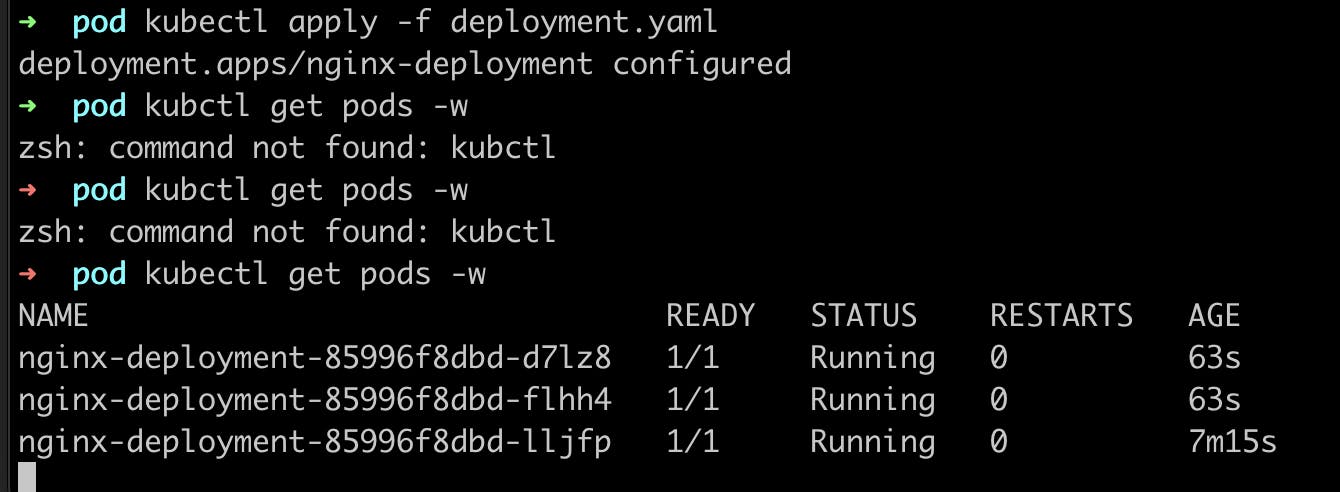
These three pods are created by replicas.
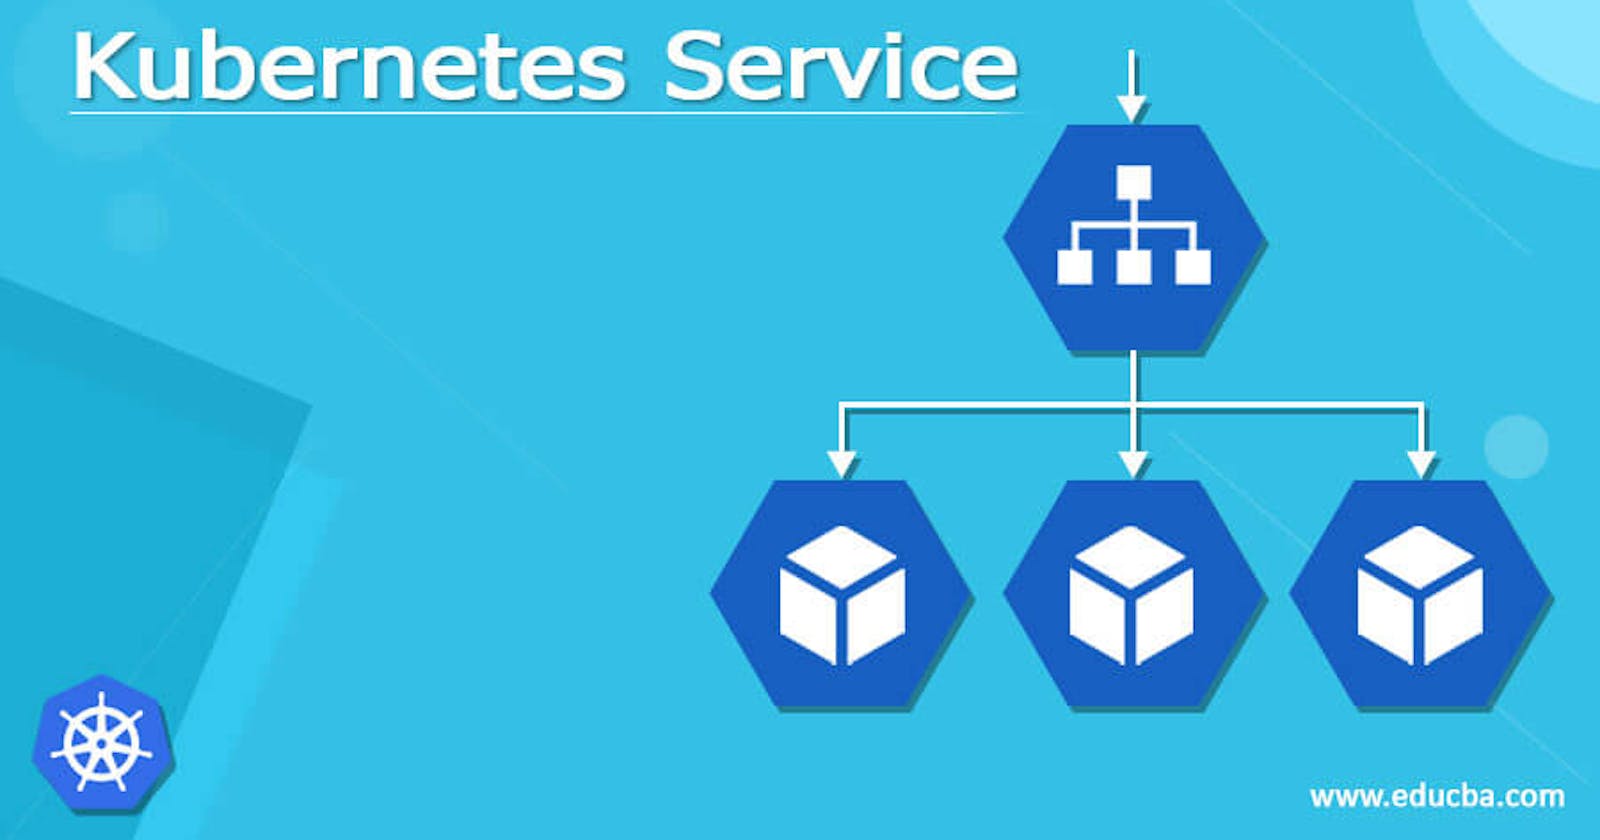
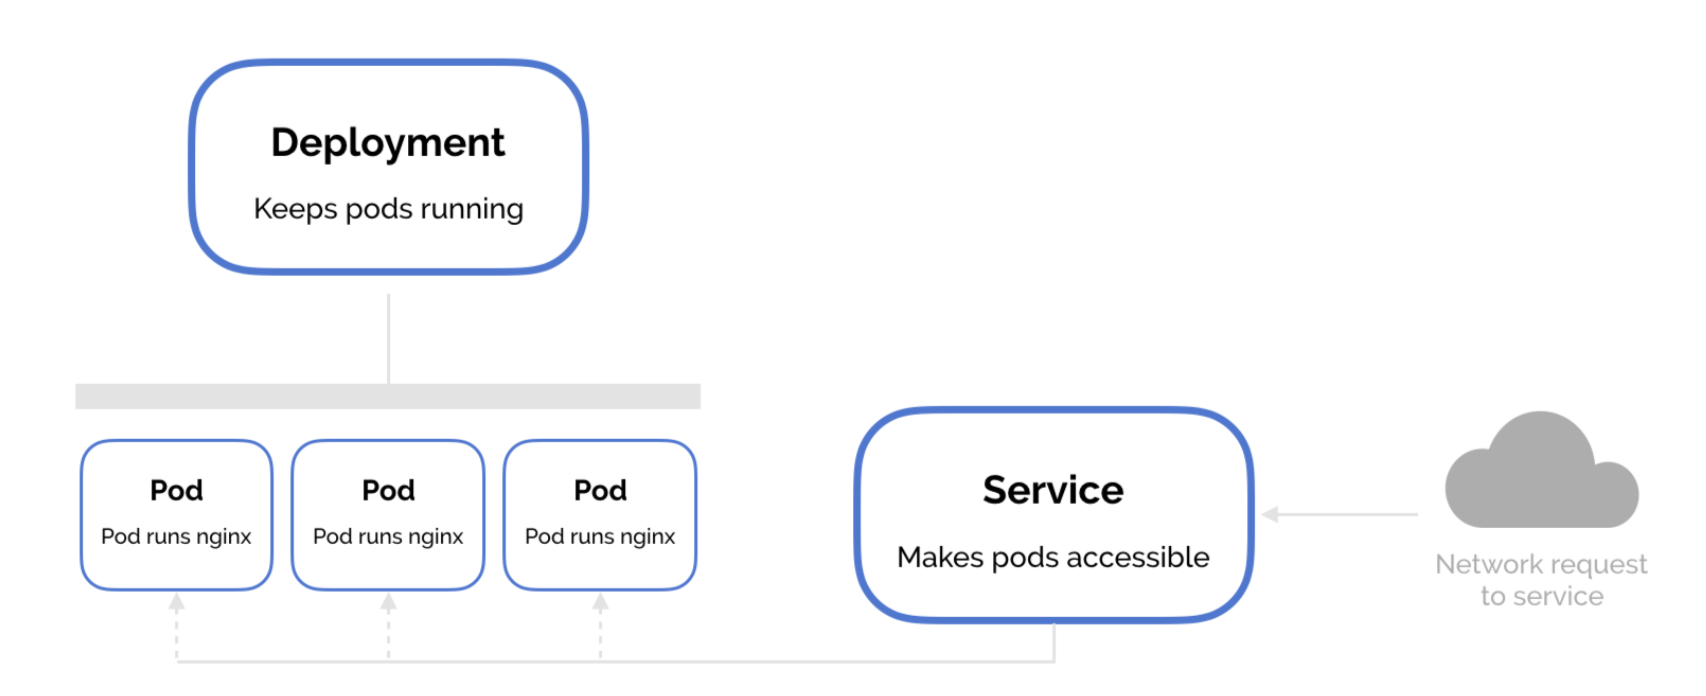
What is Kubernetes Services
Service is an abstraction that provides a single IP address and a DNS name that can be used to access the pods, even if the pods are dynamically created, scaled, or replaced. They allow reliable and consistent access to pods, both internally and externally, and enable seamless communication between different components of a distributed application.
What is the difference between a service and a deployment?
A Kubernetes deployment and a service are both Kubernetes abstractions that are used to manage and deploy applications. However, they have different purposes and responsibilities.
A deployment is responsible for keeping a set of pods running. It does this by creating and managing a ReplicaSet, which is a group of identical pods. When a pod in a deployment fails, the deployment will automatically create a new pod to replace it. Deployments can also be scaled up or down to increase or decrease the number of pods running.
service is responsible for providing network access to a set of pods. It does this by creating a single point of access for pods that are part of the same service. This makes it easier for other pods or applications to connect to the pods in the service.
Why services?
Service Discovery -
Service discovery refers to the process of connecting to a Kubernetes service. Services provide Pods with a network connection, making them discoverable.
Applications are designed using microservices. The different components need to communicate within a microservices architecture for applications to function, but individual IP addresses and endpoints change dynamically.
Suppose we have a microservices-based application deployed in Kubernetes. Each microservice is running as a set of pods for scalability and auto-healing. These pods can have dynamic IP addresses that may change due to scaling, rescheduling, or failures.
In a microservices-based application, suppose we have a frontend web application that needs to communicate with one of the microservices to retrieve data.
Without a Service, the frontend application would need to know the specific IP addresses and ports of the pods running the microservice. This would create a problem because the IP address is going to change n number of times due to its dynamic behaviour.

With service discovery in Kubernetes, The Service resource assigns a stable DNS name to the other microservices. frontend Service can now communicate with the Service using the DNS name
By using service discovery, the frontend application does not need to know the specific IP addresses of the pods running other services. It can simply use the DNS name, and Kubernetes takes care of resolving that name to the appropriate endpoints.
frontend application -> K8s Services -> deployment -> Replicas -> pods
Load Balancing
Load balancing in pods is the process of distributing network traffic across multiple instances of a pod to ensure efficient utilization of resources and high availability. Kubernetes provides built-in load-balancing mechanisms that help distribute incoming requests or network traffic among the pods that are part of a Service.
If there are only one replica and request are more than 200 then it will be very hard to serve all request, depending upon the load on the application we will increase the replieSet.
By default pods and deployment do not have load balancing mechanism but if you create a service then you will get load balancing mechanism
Types of Services
There are four types of Kubernetes services —
ClusterIPNodePortLoadBalancerExternalName
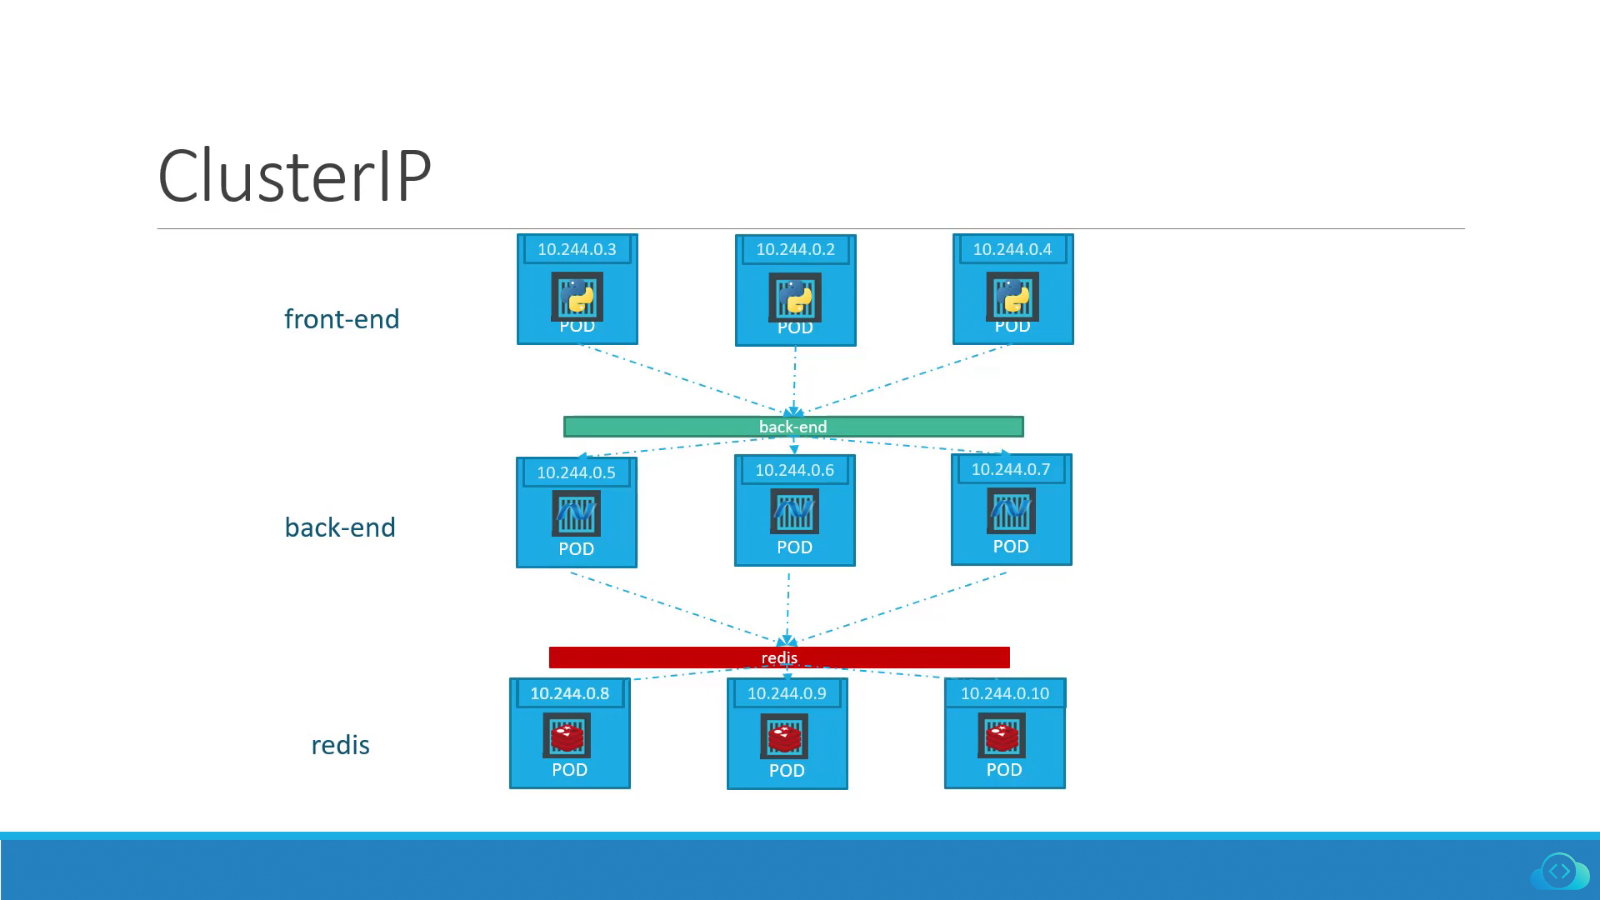
ClusterIP -
This is the default service type. It exposes the service on a cluster-internal IP address. This type makes the service only reachable from within the Kubernetes cluster. You cannot make requests to service (pods) from outside the cluster.
The ClusterIP Service is used for Pod-to-Pod communication within the same cluster. For example, communication between the front-end and back-end components of your app.
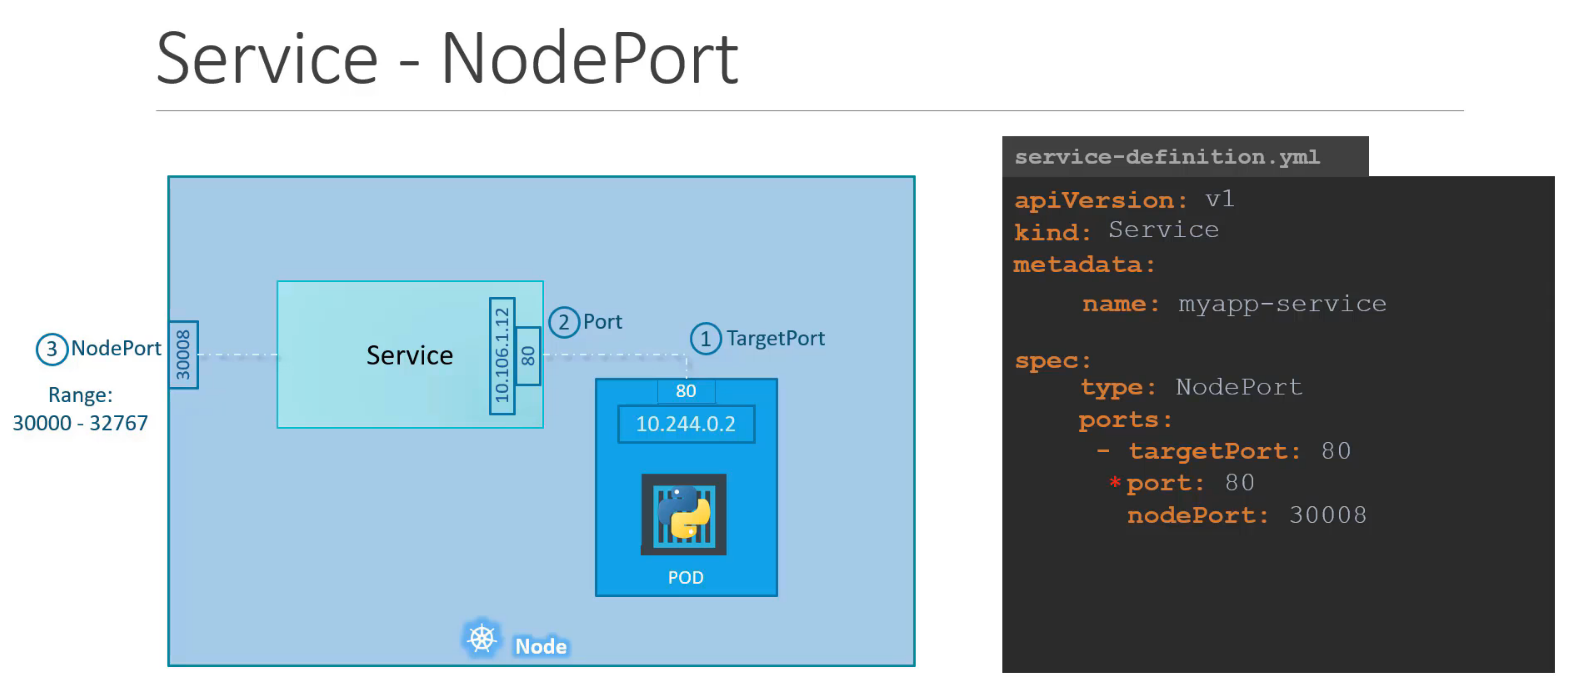
NodePort -
NodePort services expose the service on each node's IP. This makes the service accessible from outside the cluster using
<NodeIP>:<NodePort>. but, it does not provide any load balancing. This means that all traffic for the service will be routed to the same node, which can lead to performance problems if the node becomes overloaded.NodePort Service is a way to expose your application to external clients or within Organization.
Load balancer -
This makes the service accessible from outside the cluster using a public IP address. LoadBalancer services expose the service via the cloud provider's load balancer like if you have deployed this on EKS kubernetes cluster and you have chosen service as load balncer then you will get ELB ( elastic load balancer ) IP address, it is public IP address
This makes the service accessible from outside the cluster using a public IP address. LoadBalancer services also provide load balancing, which distributes traffic across multiple nodes. This helps to improve performance and availability.

How to expose the Application by using in Kubernetes services
ClusterIP
Prerequisites
A Kubernetes cluster (Minikube cluster will also work)
First, create a deployment file (e.g.,
deployment.yaml) to define your Pod. Here's a simple example:apiVersion: apps/v1 kind: Deployment metadata: name: my-portfolio labels: app: my-portfolio spec: replicas: 2 selector: matchLabels: app: my-portfolio template: metadata: labels: app: my-portfolio spec: containers: - name: portfolio image: hemantsw/portfolioApply the deployment yaml.
kubectl apply -f deployment.yaml
Now pods are up and running you can check by
kubectl get pods
after that create a service file service.yaml
  apiVersion: v1
  kind: Service
  metadata:
    name: my-service
  spec:
    type: ClusterIP
    selector:
      app: my-portfolio
    ports:
      - protocol: TCP
        port: 80
        targetPort: 80
service is up and running you can check by
kubectl get svc
To know the IP address of the pod use this command
kubectl get pods -o wide
let’s check whether our pods can communicate with each other. In order to that, we are going to go into a specific pod and then run a ping command to the other pods.
To go inside the pods use
kubectl exec -it my-pod -- /bin/bashcommand
now you are inside the pod with IP address 10.244.0.4.
We try to ping to the other pod with IP address 10.244.0.3
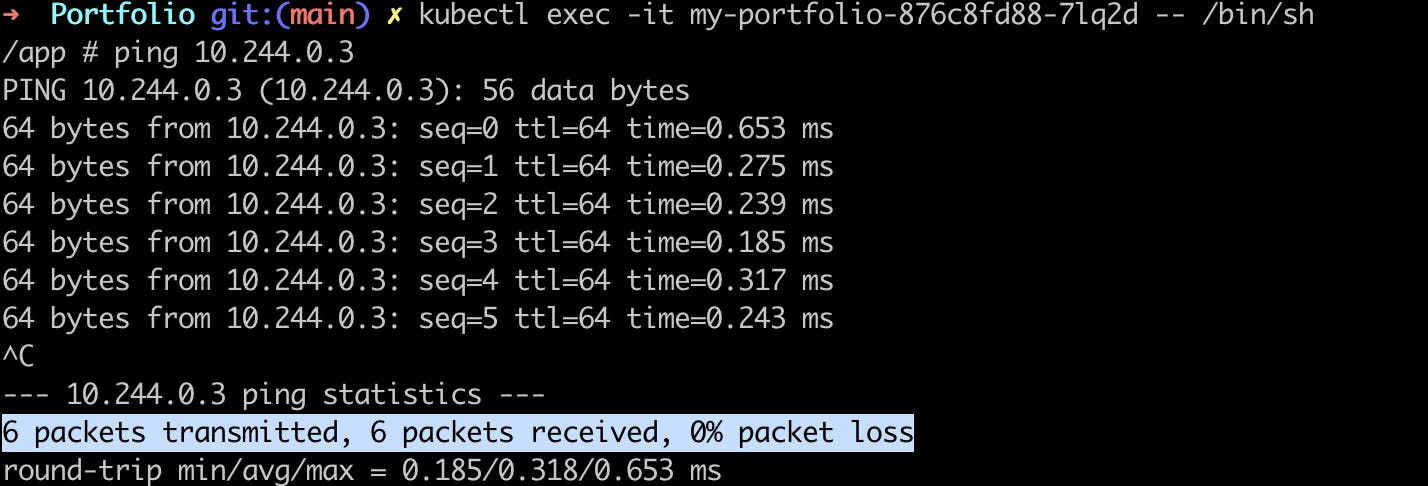
as you can see the pod can communicate with each other
Now to run the application within the cluster just copy the IP address of the pod and execute
minikube sshand enter thecurl -L http://pod-IP:port-on-app-runs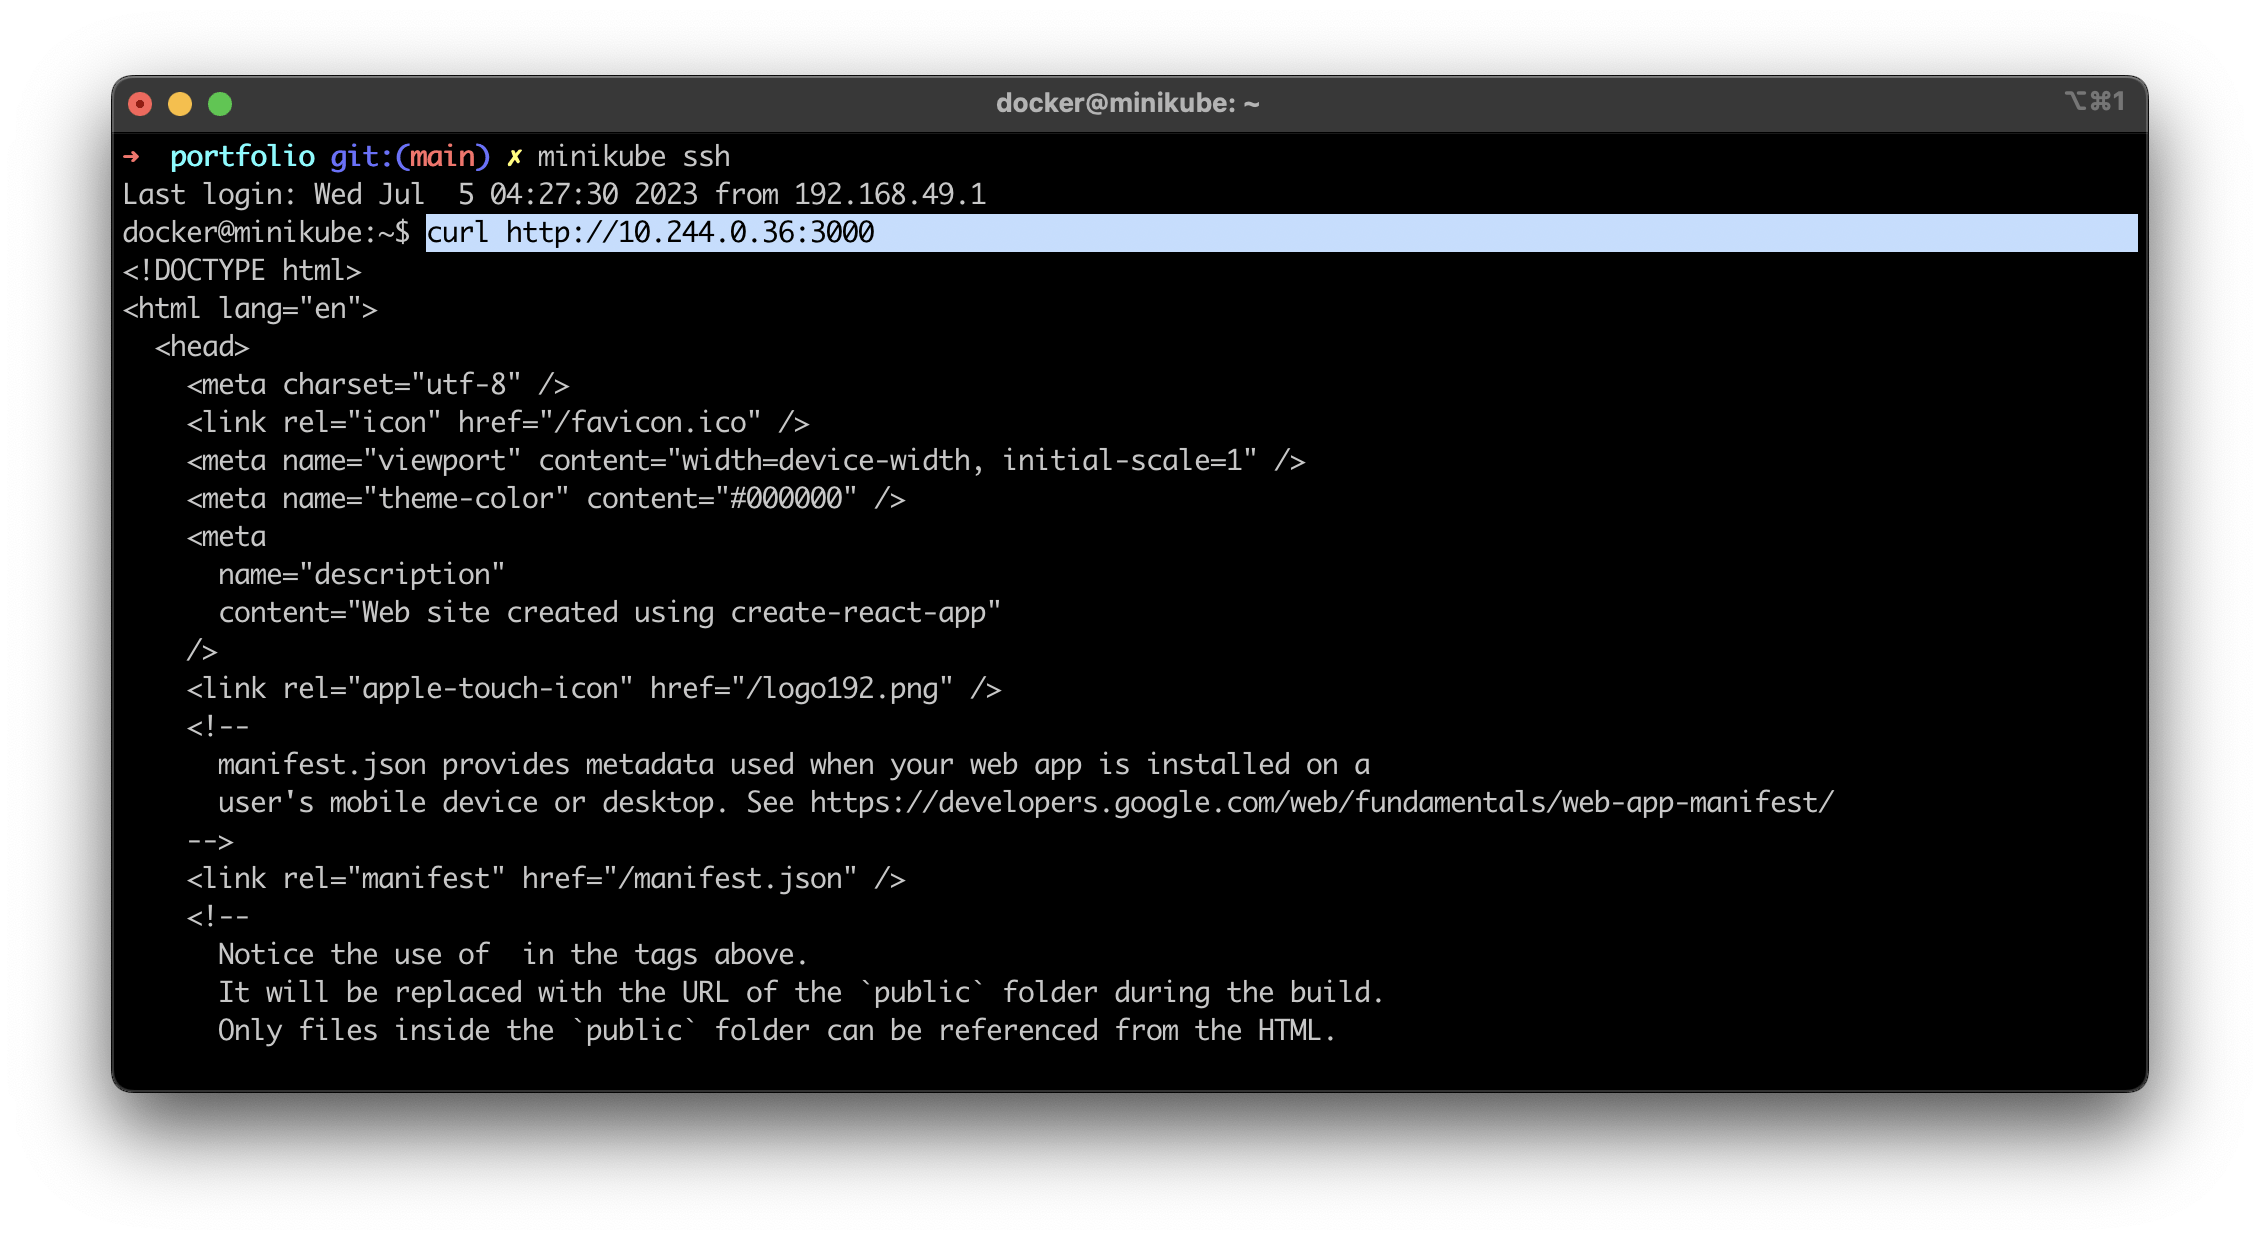
as you can see the application is running within the cluster.
But we have to do something by which our application can be accessible from the outside Kubernetes cluster means accessible from the outside world
To access applications outside the cluster we have to create services There are -
NodePort mode
Loadbalancer
NodePort
service by which one can access the application from outside the world
First, we will create a nodePort service to a create a service first create service.yaml file by
vim service.yamlapiVersion: v1 kind: Service metadata: name: my-service spec: type: NodePort selector: app.kubernetes.io/name: MyApp ports: - port: 80 targetPort: 80 nodePort: 30007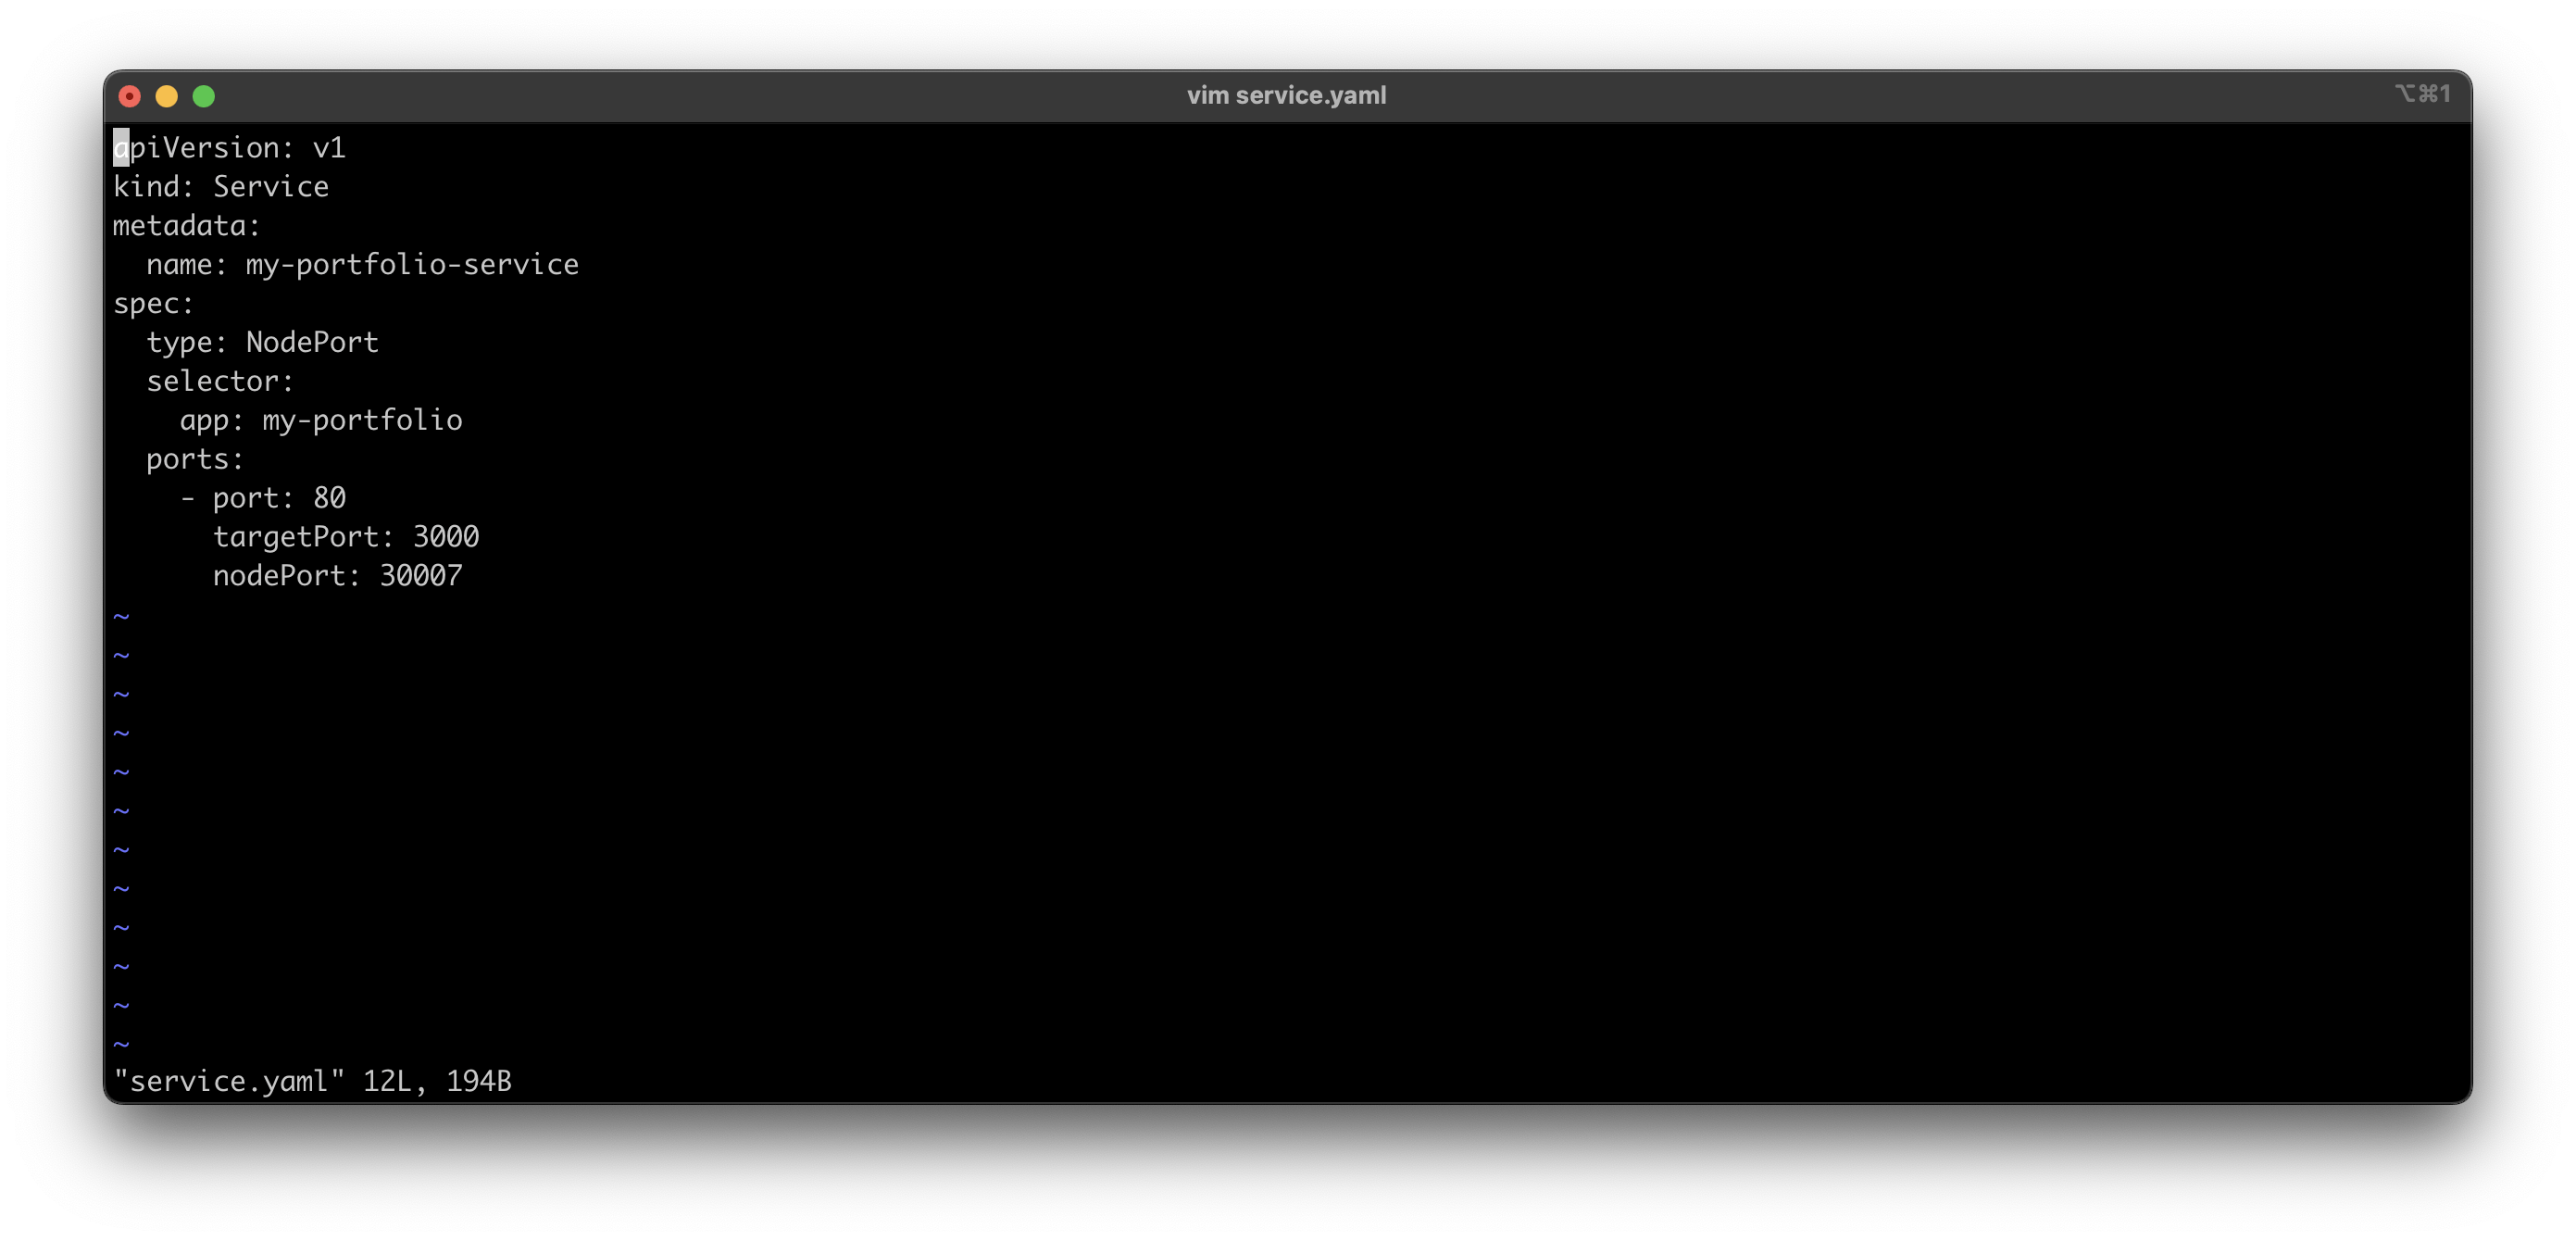
after that save this file and apply the service by
kubectl apply -f service.yamland to check the service is created or not use this commandkubectl get svc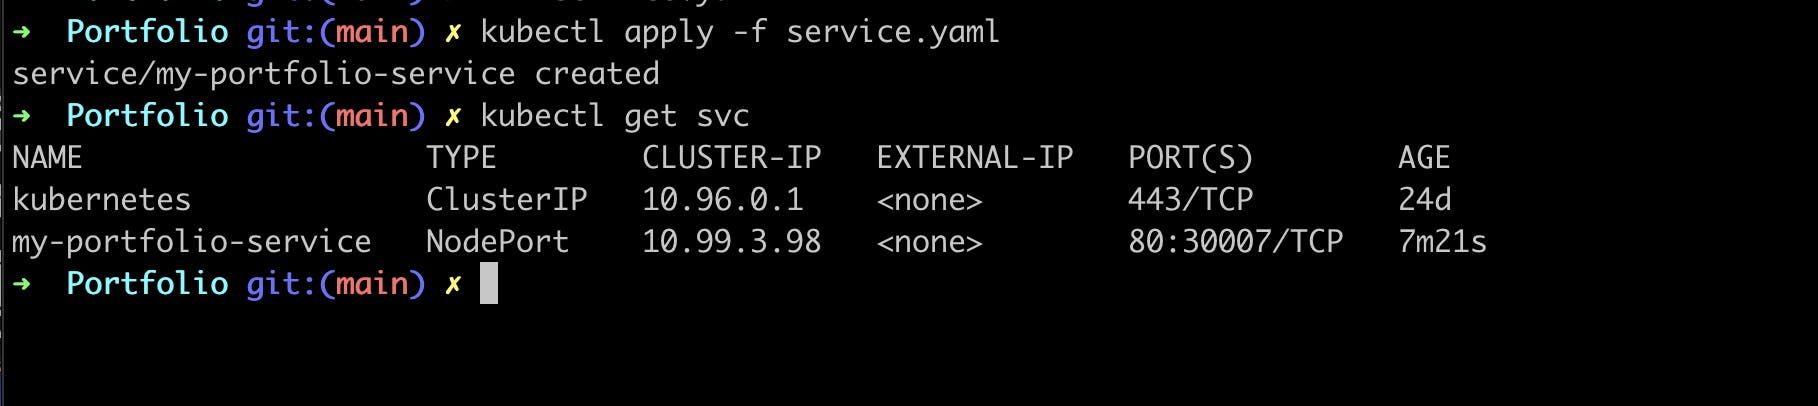
To view an application on the browser with a node port just run this command
minikube service your-service-name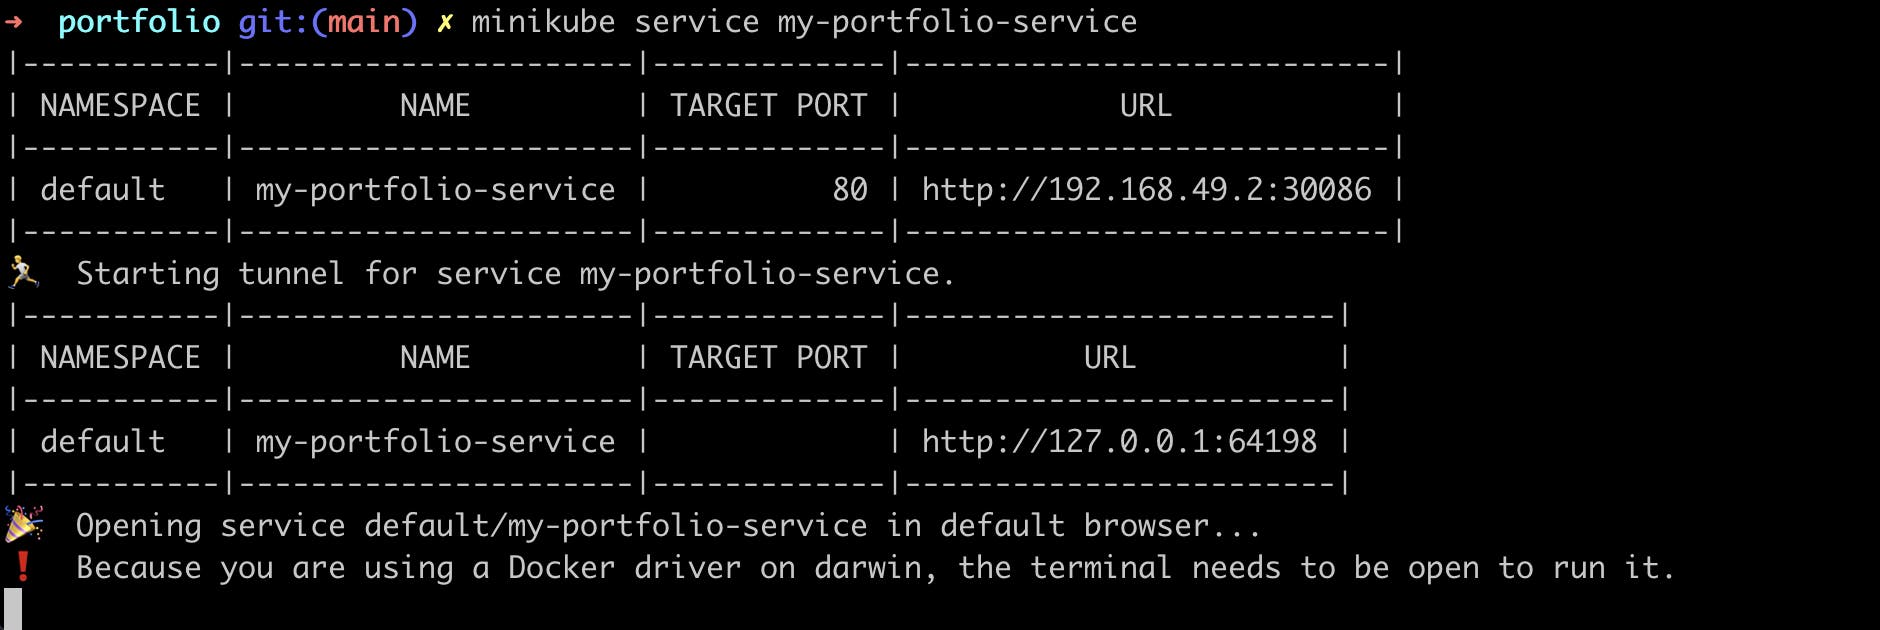
just copy the URL and paste it into your browser
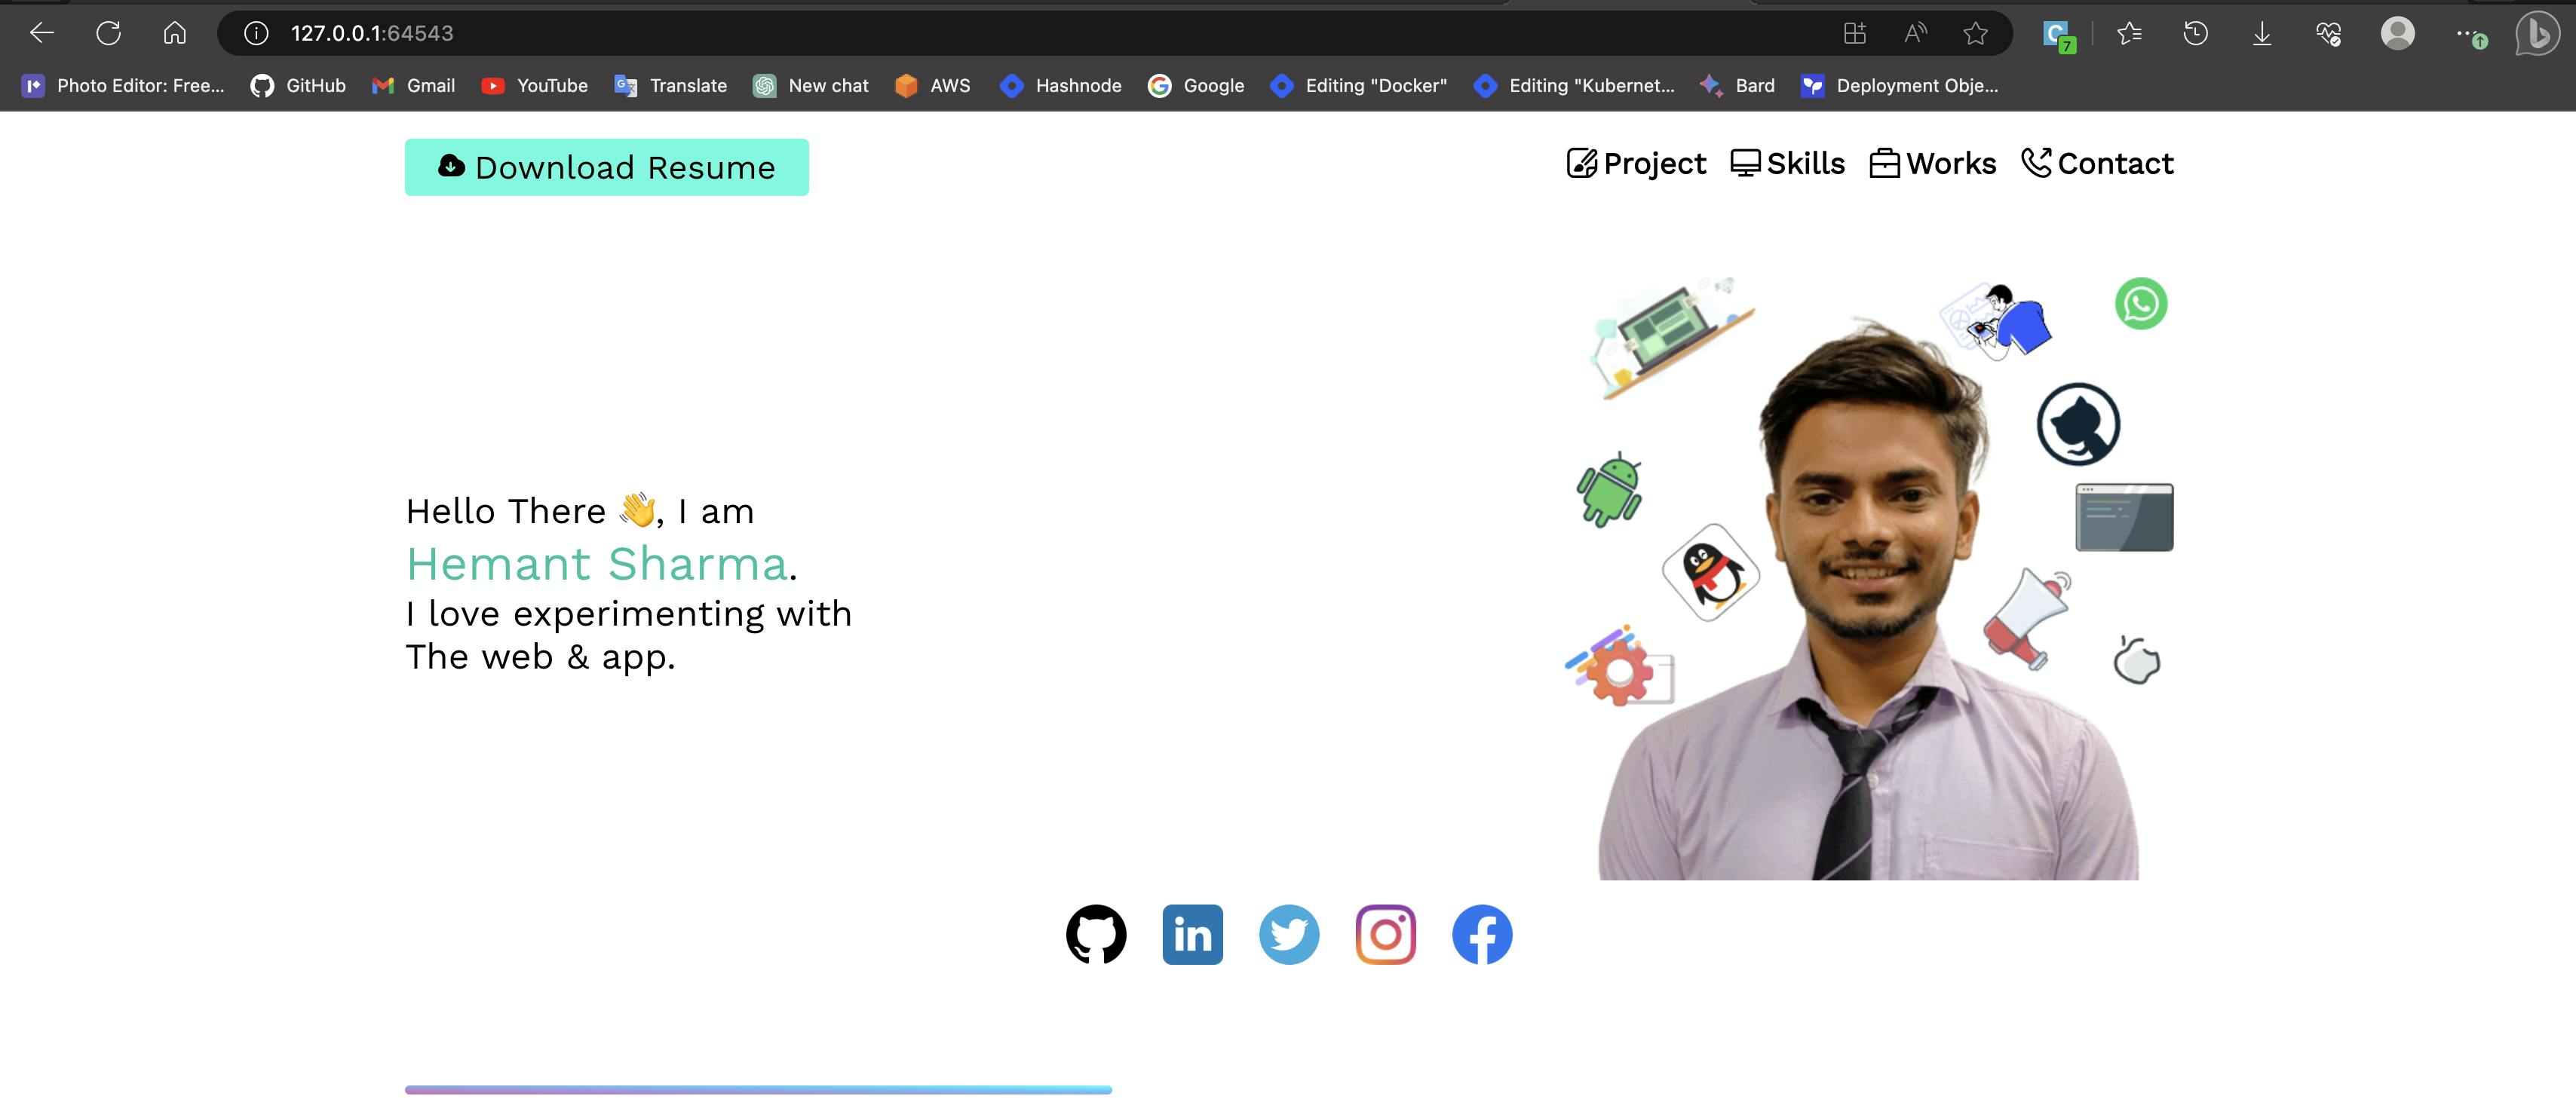
as you can see that it is up and running
- but if you use the same URL in a different system then it will not work because NodePort is only accessible which have access to the node IP address and it is not exposed to the outside world.
To expose the Application to the outside world then you should use load balancer type service
LoadBalancer
To expose service on loadbalancer you just have to edit the service type from the NodePort to LoadBalancer by
kubectl edit svc service-name

When you see kubectl service the IP address is not allocated, external IP will remain pending because minikube is local environment for testing purposes, If it was any cloud provider like AWS then the IP address is allocated by CCM (cloud control manager)
If you’re not running on a supported IaaS platform (GCP, AWS, Azure…), LoadBalancers will remain in the “pending” state indefinitely when created.

but we can expose the application on Minikube by using MetalLB it is currently in testing phase so it is not recommended
But in Minikube we can get external IP by using the tunnel command
Run the tunnel in a separate terminal
minikube tunnel
Now open a new terminal and when you run
kubectl get svcthen you will get external IP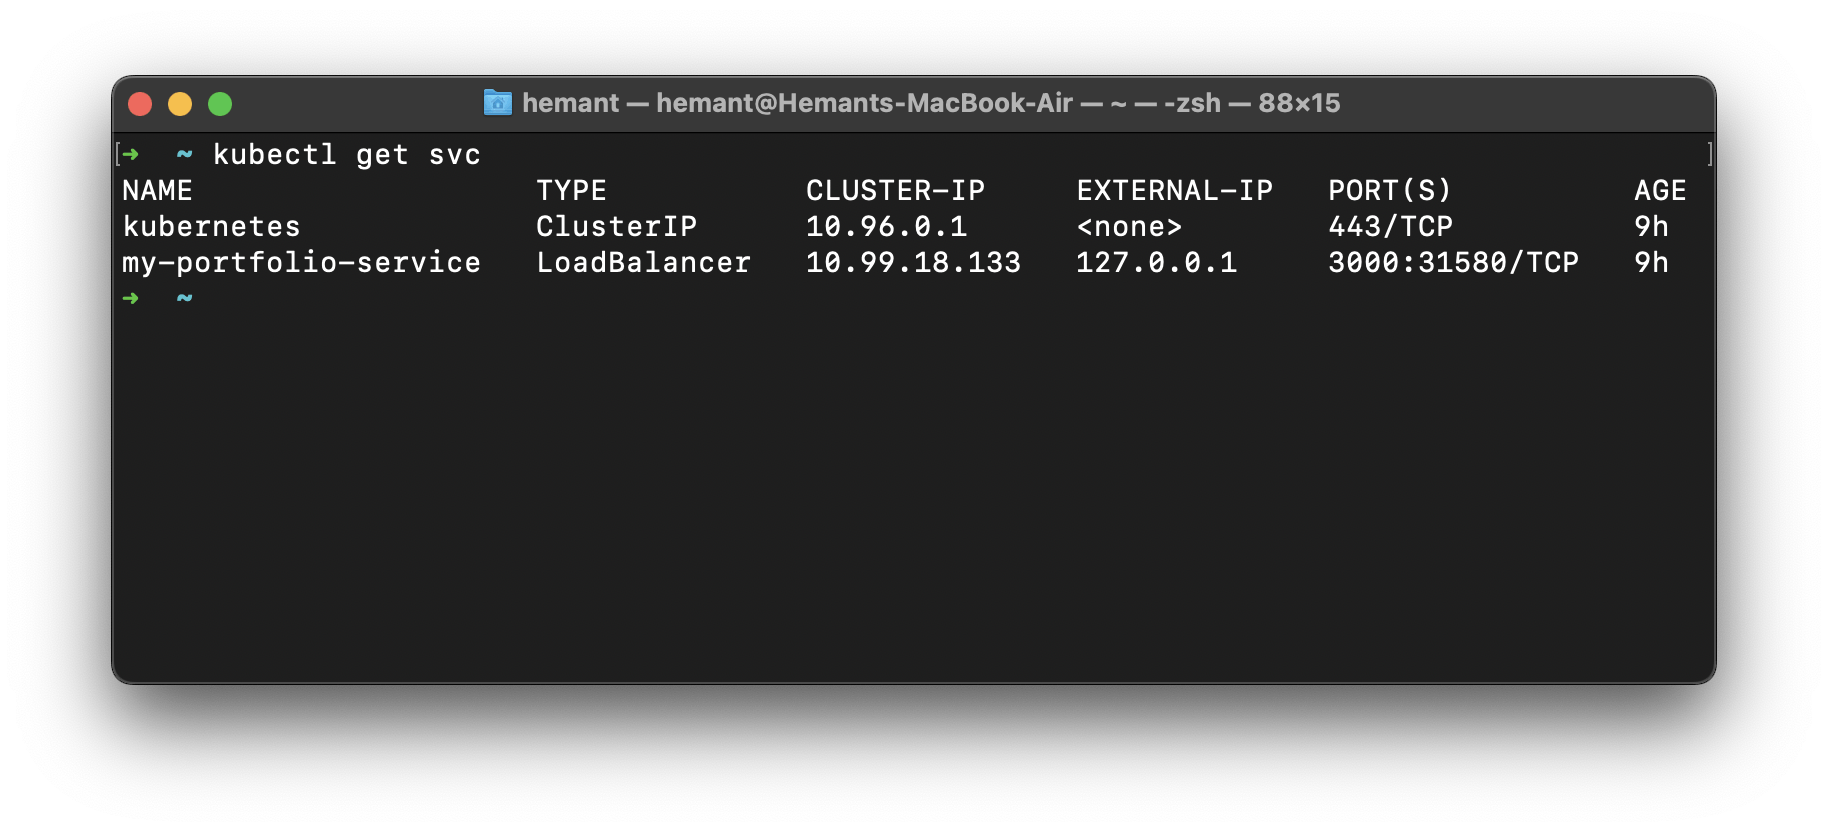
On the browser just enter the your external-IP:Port and it will be open
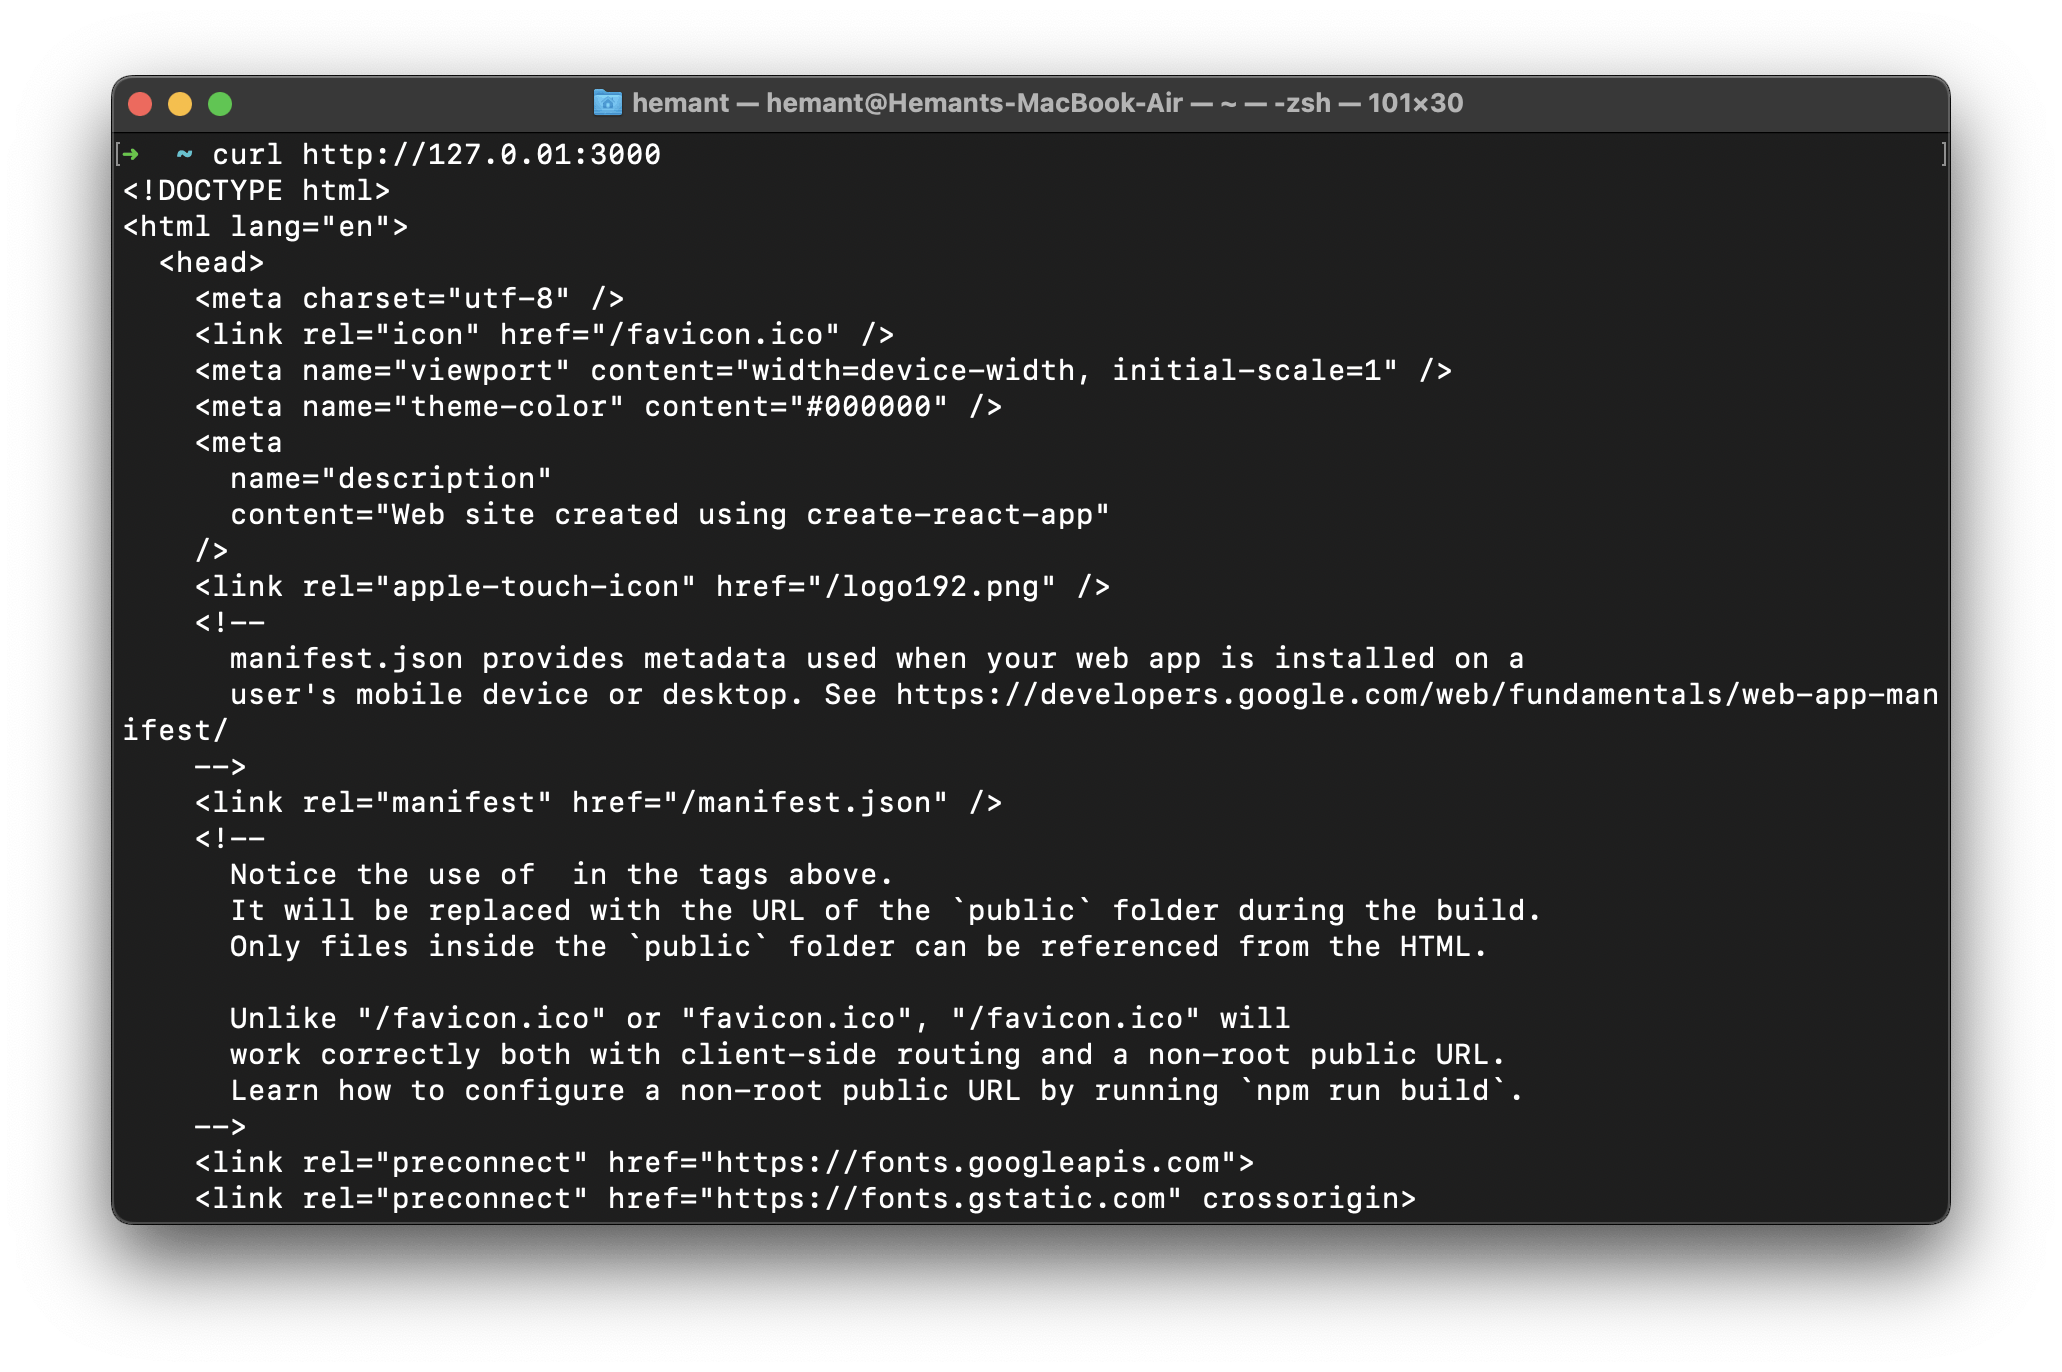
In my case my URL is http://127.0.01:3000
Done, In the next blog we will see how to use the Ingress service.