

Container orchestration
There are various approaches to building applications, and the choice depends on factors such as the application's complexity and organizational needs.
There are two architectural approaches for building applications-
Macro-services
Micro-services
Macro-services
It follows a traditional approach where the entire application is developed, deployed and integrated into a single large application.
In this all the services are bundled off in one container, for example, suppose you have an application and in that application, we have -
Frontend
Backend
Database
networks
The problem with the monolithic approach is that suppose we want to make any modification in the application we have to deploy the entire application again. which is not a good practice, Now we don't use this approach.
This approach is ideal for small applications. but, as the application grows larger and more complex, maintenance and scalability can become challenging.
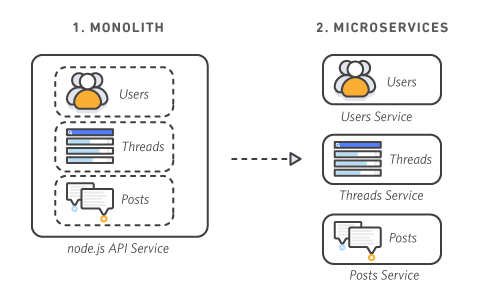
Micro-services
Microservices architecture is an approach where, breaking down a large application into smaller, independent services that communicate with each other through APIs.
In Microservices, we deploy each service individually like Frontend, Backend, and Database. So in this approach, we do not need to deploy the entire application we just deploy a specific service and every container running Isolated with their own dependency and configuration and they are not dependent on another container
At the same time, containerized applications were growing bigger and more complex. Manual handling of these applications soon became difficult to configure, manage, and keep the whole system running smoothly.
So to manage n numbers of containers we have to use something which can solve this issue. This created the need for container orchestration technologies
What is Container Orchestration -
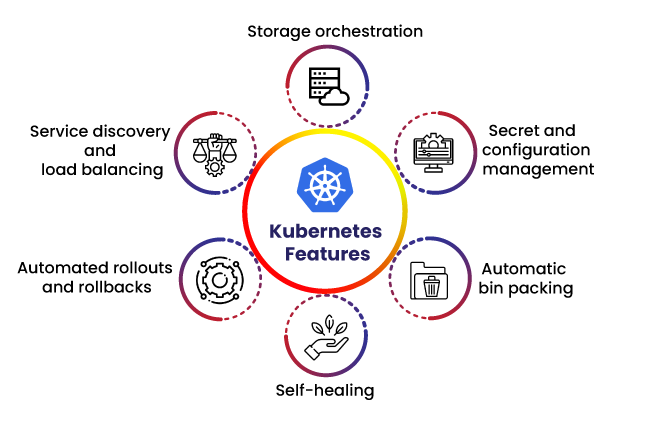
Container orchestration automates the deployment, management, scaling, and networking of applications.
Enterprises that need to deploy and manage hundreds or thousands of containers and hosts can containers benefit from container orchestration.
Container orchestration is used to automate the following tasks at scale:
Configuring and scheduling containers
Provisioning and deployment of containers
Redundancy and availability of containers
Scaling up or removing containers to spread application load evenly across host infrastructure
Movement of containers from one host to another if there is a shortage of resources in a host, or if a host dies
Allocation of resources between containers
External exposure of services running in a container with the outside world
Load balancing of service discovery between containers
Health monitoring of containers and hosts
container orchestration tools -
- Kubernetes
What is Kubernetes?
Kubernetes is an open-source container orchestration platform, the core concept of Kubernetes is to group containers into logical units called pods. Pods can contain one or more containers that are tightly coupled and share resources, such as networking and storage.
By using Kubernetes, organizations can efficiently manage containerized applications, automate deployment and scaling, achieve high availability, and simplify the overall management of complex microservices architectures.
Why Kubernetes when we have Docker?
While Docker provides an efficient way to containerize applications, Kubernetes is a container orchestration platform that helps manage and scale containerized applications
Problem with docker -
Single Host - Docker platform is a single-host platform means on your host machine or EC2 you have installed Docker and run your all container, the problem with this approach is that
Resource limitations: Containers competing for resources like CPU, memory, and disk space can impact performance.
Network connectivity: Managing container-to-container communication and avoiding port conflicts can be tricky.
Single point of failure: Host machine issues can result in downtime for all containers.
Security concerns: Containers sharing the host's kernel may pose security risks if one container is compromised.
Self-Healing - Let's say any of your containers is killed then what happens is the application running inside the container is not accessible then to access that application you have to manually restart the container, so the concept of auto-healing is missing in the docker.
Self-Scaling - Suppose you are running a container and it can use a maximum 4GB RAM and 4GB CPU of resources from your host suddenly the load on the application is increased so in that case you have to scale your container from 1 to 10 container to manage the load but docker doesn't support auto-scaling feature.
Load-Balancing - It means the distribution of incoming network traffic across multiple containers running the same application. docker doesn't support scaling so this feature is also missing.
These all problems are solved by Kubernetes let's know how
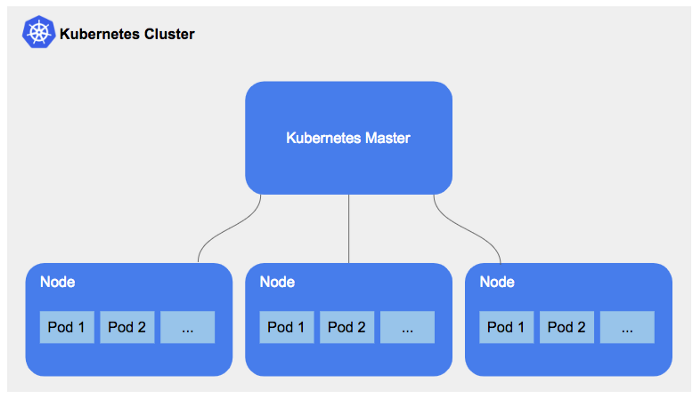
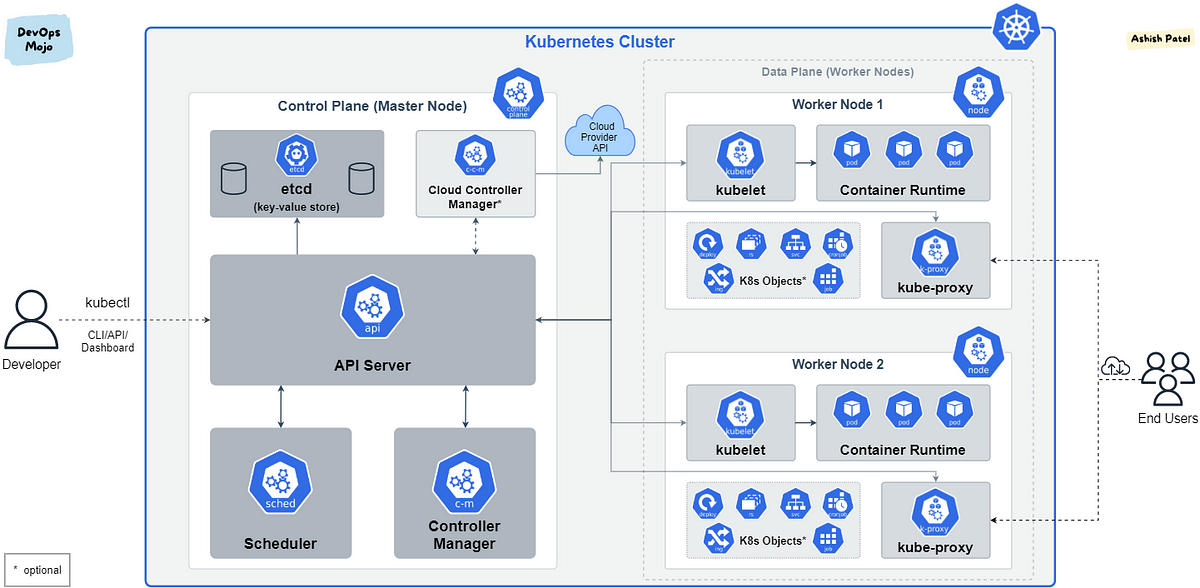
By default Kubernetes is a cluster means If you're running Kubernetes then you're running a cluster.
What is Kubernetes Cluster?
A cluster is a group of nodes that work together to run containerized applications.
In an architecture, Whenever we install Kubernetes it means we create one master node with multiple worker nodes
How Kubernetes solves the problem of docker
Using Cluster instead of single-host - The advantage of using a cluster is that suppose there are two worker nodes and in the first node there are 10 containers running in a pod, if any one container is start taking lots of resources and due to that specific container the performance of other containers is also affected then Kubernetes immediately puts that specific container in a different node.
Using Replica-set for Auto-scaling - The problem of auto-scaling is also solved by Kubernetes as it is using Replica set with replica set you don't need to deploy a new container if you need to scale your application to handle increased traffic then the ReplicaSet will take care of creating new containers in the pod.
Using proactive monitoring for auto-healing - Suppose any of your containers goes down then Kubernetes has the feature of auto-healing when any container goes down then before the container goes down it will roll out a new container
Kubernetes Architecture
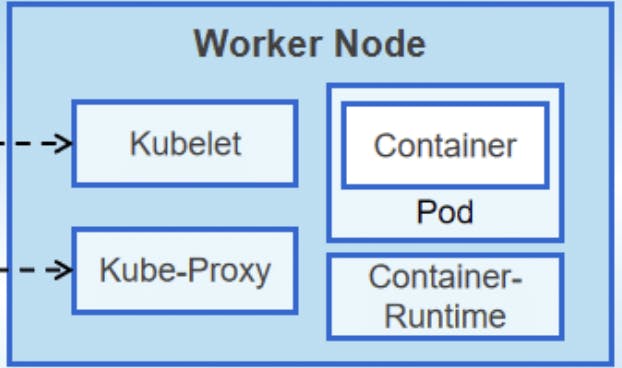
Worker Node
It is responsible for running and managing containers
Kubectl -
It is a command-line tool that is used to interact with Kubernetes clusters. With Kubectl, you can perform various operations on your Kubernetes cluster, such as creating and managing pods, deployments, services, namespaces, and more
To get kubectl CLI commands refer to this link kube-cli-commands
These are the three components that are present on the worker node
Kublet
container run time
kube-proxy
In Kubernetes, the simplest thing is Pod which basically a collection of one or more than one container.
Container Runtime
- To run a pod then you should have a container run time because inside the pod there are containers so you need a container runtime. the container runtime in Kubernetes is responsible for running containers within the cluster. Kubernetes support docker shim, containerD, and cri-o as container run time.
Kubelet
- In Kubernetes we have a component called kubelet which is responsible for the management of pod, if the pod is not running then kubelet immediately informs Kubernetes and it will take action. It receives commands from the API server and instructs the container runtime to start or stop containers as needed.
Kube-proxy
- It is responsible for maintaining network rules on each node. Network rules enable network communication between nodes and pods. Kube-proxy can directly forward traffic or use the operating system packet filter layer.
Control Plane
API server
- The API server is the heart of Kubernetes that take all the request from the external world The API server is the interface used to manage, create, and configure Kubernetes clusters.
Scheduler
let's say we are trying to create a pod then the request goes to the API server and it will look if any node is free then it will schedule the component on that node with the help of the scheduler
The scheduler is responsible for scheduling your pods and scheduling your resources on Kubernetes
ETCD
It is a backup service that holds information about configuration data and cluster status. It is key value store and the entire kubernetes cluster information is stored as object.
It is important to secure etcd in your Kubernetes clusters because attackers who take control of etcd have effective control over the entire cluster.
Controller Manager
In Kubernetes, there are by default multiple controllers like Replica set and there has to be a component that ensures that these controllers are running and that component is called controller manager.
The Controller Manager manages various controllers responsible for maintaining the desired state of the cluster. It monitors and manages the lifecycle of different resources, such as nodes, pods, deployments, and replica sets, ensuring their availability and correctness.
Cloud Controller Manager
The cloud controller manager is a separate process that runs in the control plane and interacts with the cloud provider. It is responsible for tasks such as creating and deleting nodes, creating and deleting services, and managing persistent volumes.
The cloud controller manager is typically implemented as a plug-in, so it can be configured to work with different cloud providers. For example, there is a cloud controller manager plug-in for Amazon Web Services (AWS), Google Cloud Platform (GCP), and Microsoft Azure.
Pods
We are moving from docker to Kubernetes which means we moving from containers to container orchestration.
In docker what are we doing building a container and deploying a container, in Kubernetes we also use this container because the end goal is whether it is Kubernetes or docker to deploy our application in the container.
But In the case of Kubernetes, the smallest unit is a pod which means in Kubernetes you can not directly deploy a container, to deploy our application in a container in Kubernetes you have to define a pod.
why do we need pods to use a container in Kubernetes when we have a container?
Pods provide a layer of abstraction and additional functionalities that enhance container management and orchestration.
while containers are self-contained and isolated environments for running applications
Some advantages of using pods
Grouping and Co-location - if we want to transfer some config files and user-related files from one container to another container then in such cases instead of putting this container on different pods we put them in a single pod.
Networking - Pods have their own IP address within the cluster, and containers within the pod can communicate with each other using this IP address.
Resource sharing - Containers within a pod share resources such as CPU and memory. Kubernetes manages these resources by ensuring fair allocation and efficient utilization across containers within the pod.
Atomic Scaling and Management - In pods Instead of scaling individual containers, you scale the entire pod.
Lifecycle Management - It ensures containers are created, scheduled, started, stopped, and restarted as needed. Kubernetes monitors the health of the pod and its containers, automatically restarting failed containers.
What is pod.yaml?
By using
pod.yamlfiles, you can define and manage pods declaratively in Kubernetes. The files provide a way to specify the desired state of pods, making it easier to version control and manage pod configurations.In source code repository we can understand everything about the containers by going into the pod.yaml file.
How to deploy the application as a pod
To deploy an application in pod for that we need to install -
Kubectl - CLI to interact with Kubernetes cluster
Minikube - to create local Kubernetes cluster.
How to install Kubectl?
To install kubectl using the apt package manager on mac systems, you can follow these steps:
Open a terminal on your Mac.
Use this command to install
kubectl:brew install kubectlThis command will download and install the
kubectlbinary on your Mac.After the installation completes, you can verify the installation by checking the version of
kubectl:kubectl version --shortThis command will display the client version of
kubectlis installed on your Mac.
How to Install MiniKube?
To install Minikube you just need a docker container to use the Minikube cluster so, make sure docker is installed in your local system
For Mac use this command
brew install minikube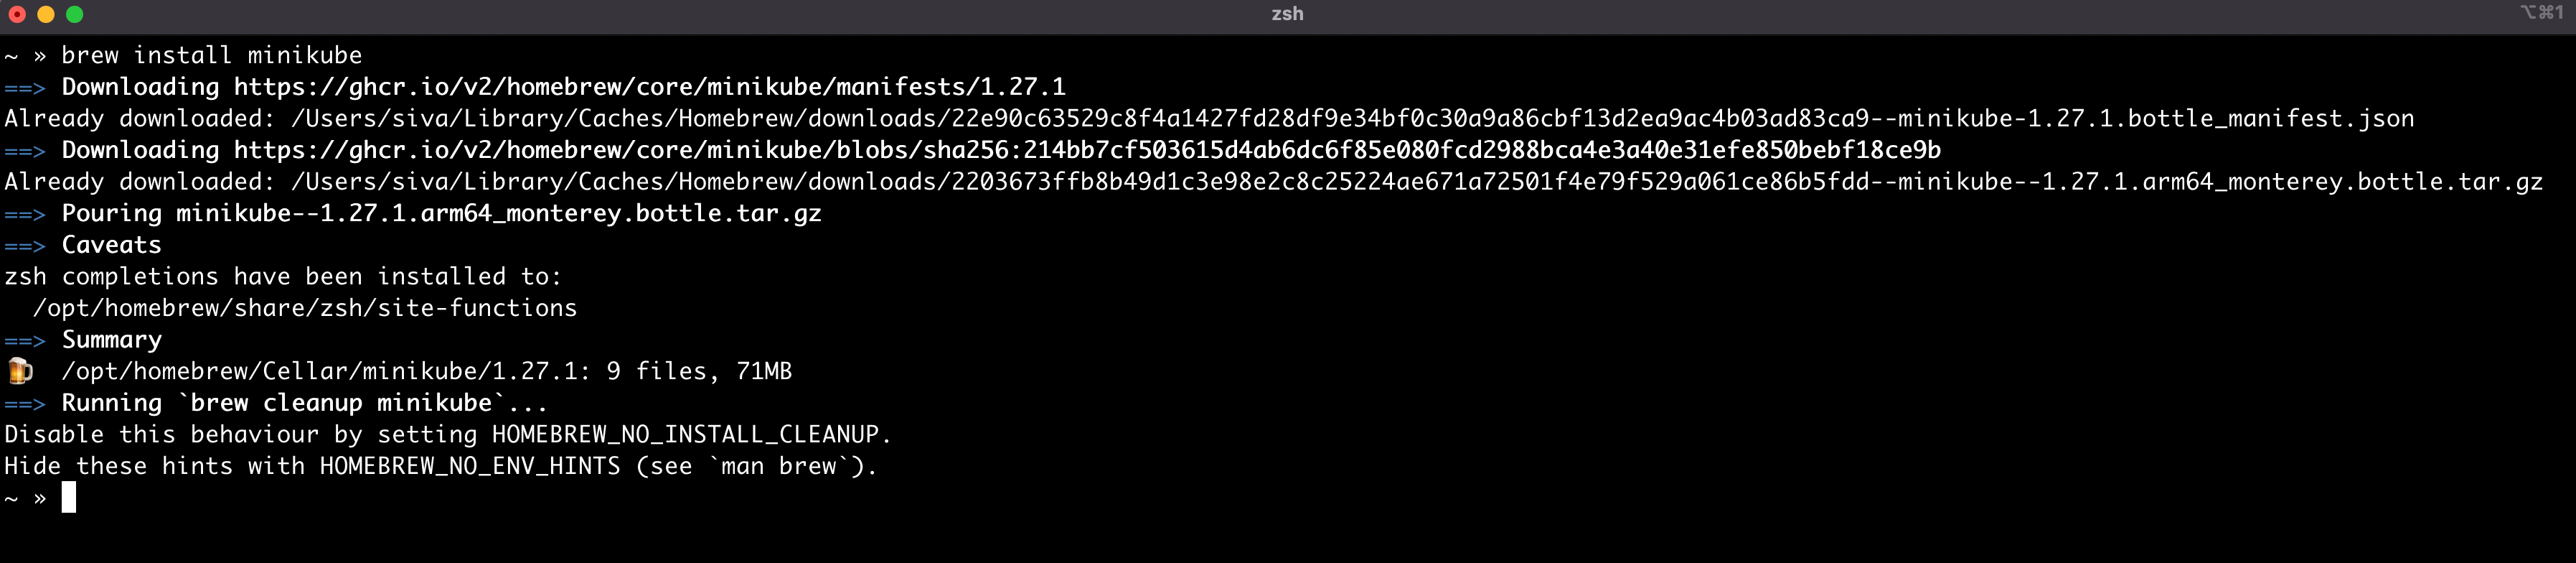
Now you need to start the minikube, run this command
  minikube start
  minikube version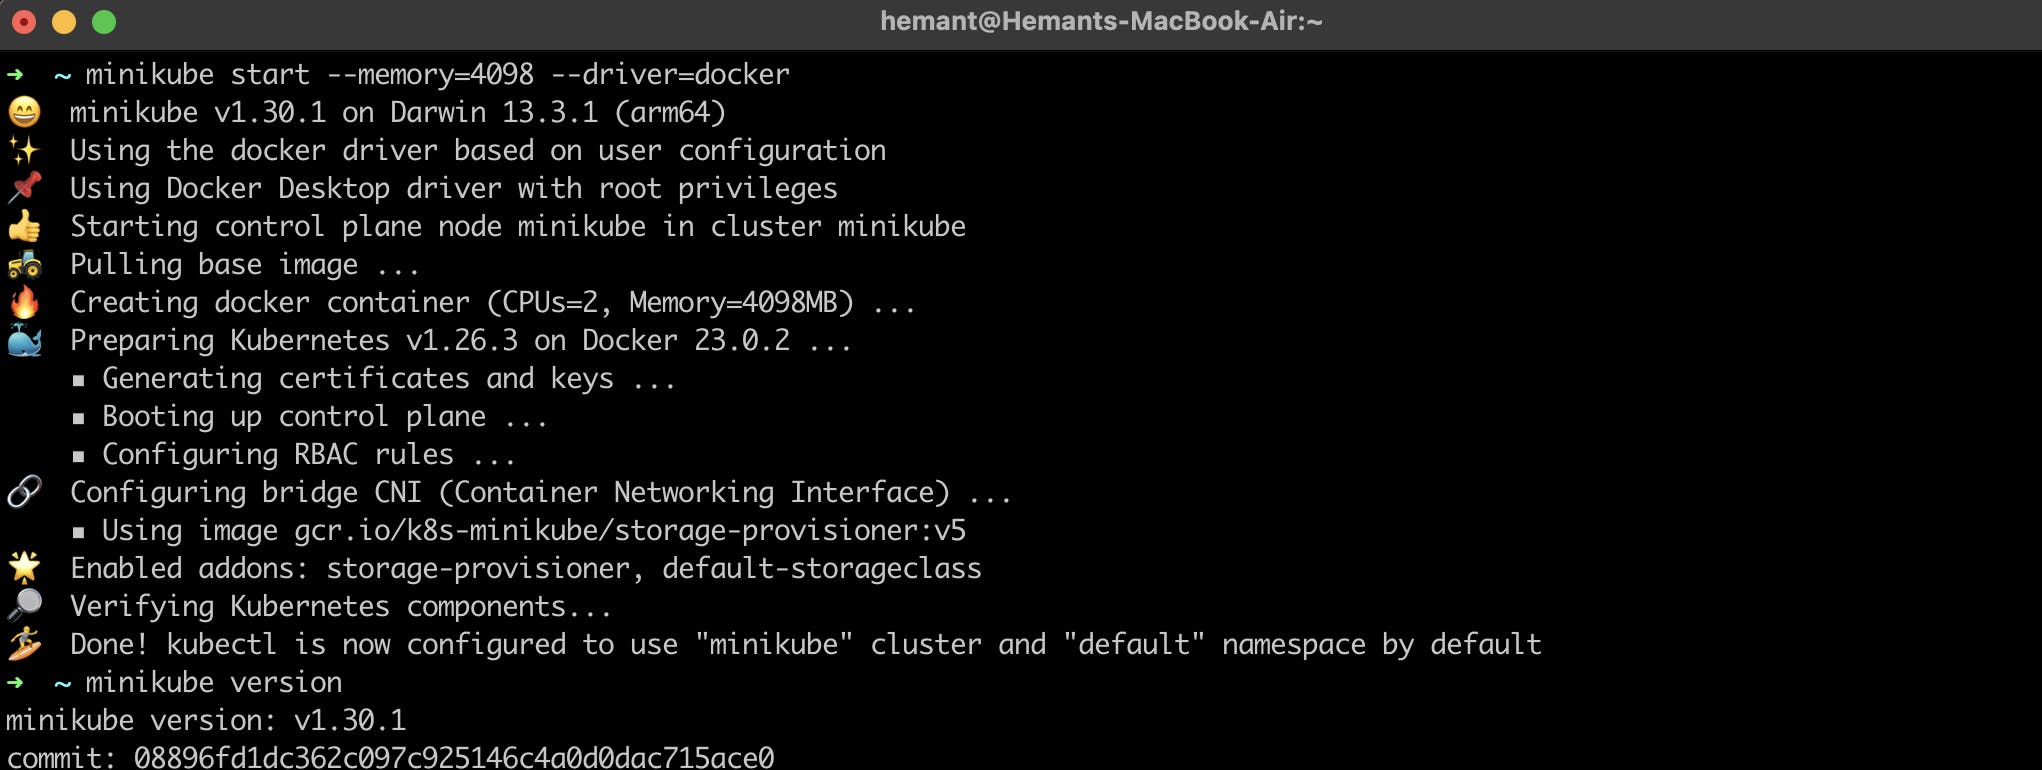
Done
Now minikube cluster created now let's create a pod to create pod first you should have an image
First you need to create a pod.yaml files and inside this yaml file we use nginx image
vim pod.yamlit will create pod.yaml file and paste this codes
  apiVersion: v1
  kind: Pod
  metadata:
    name: nginx
  spec:
    containers:
    - name: nginx
      image: nginx:1.14.2
      ports:
      - containerPort: 80
and insert this file by pressing i and paste it and save by :wq command
To create pod execute this command
kubectl create -f pod.yamlIt will create a pod

To list all the running pods use this command
kubectl get pods -o wide
Copy the IP address
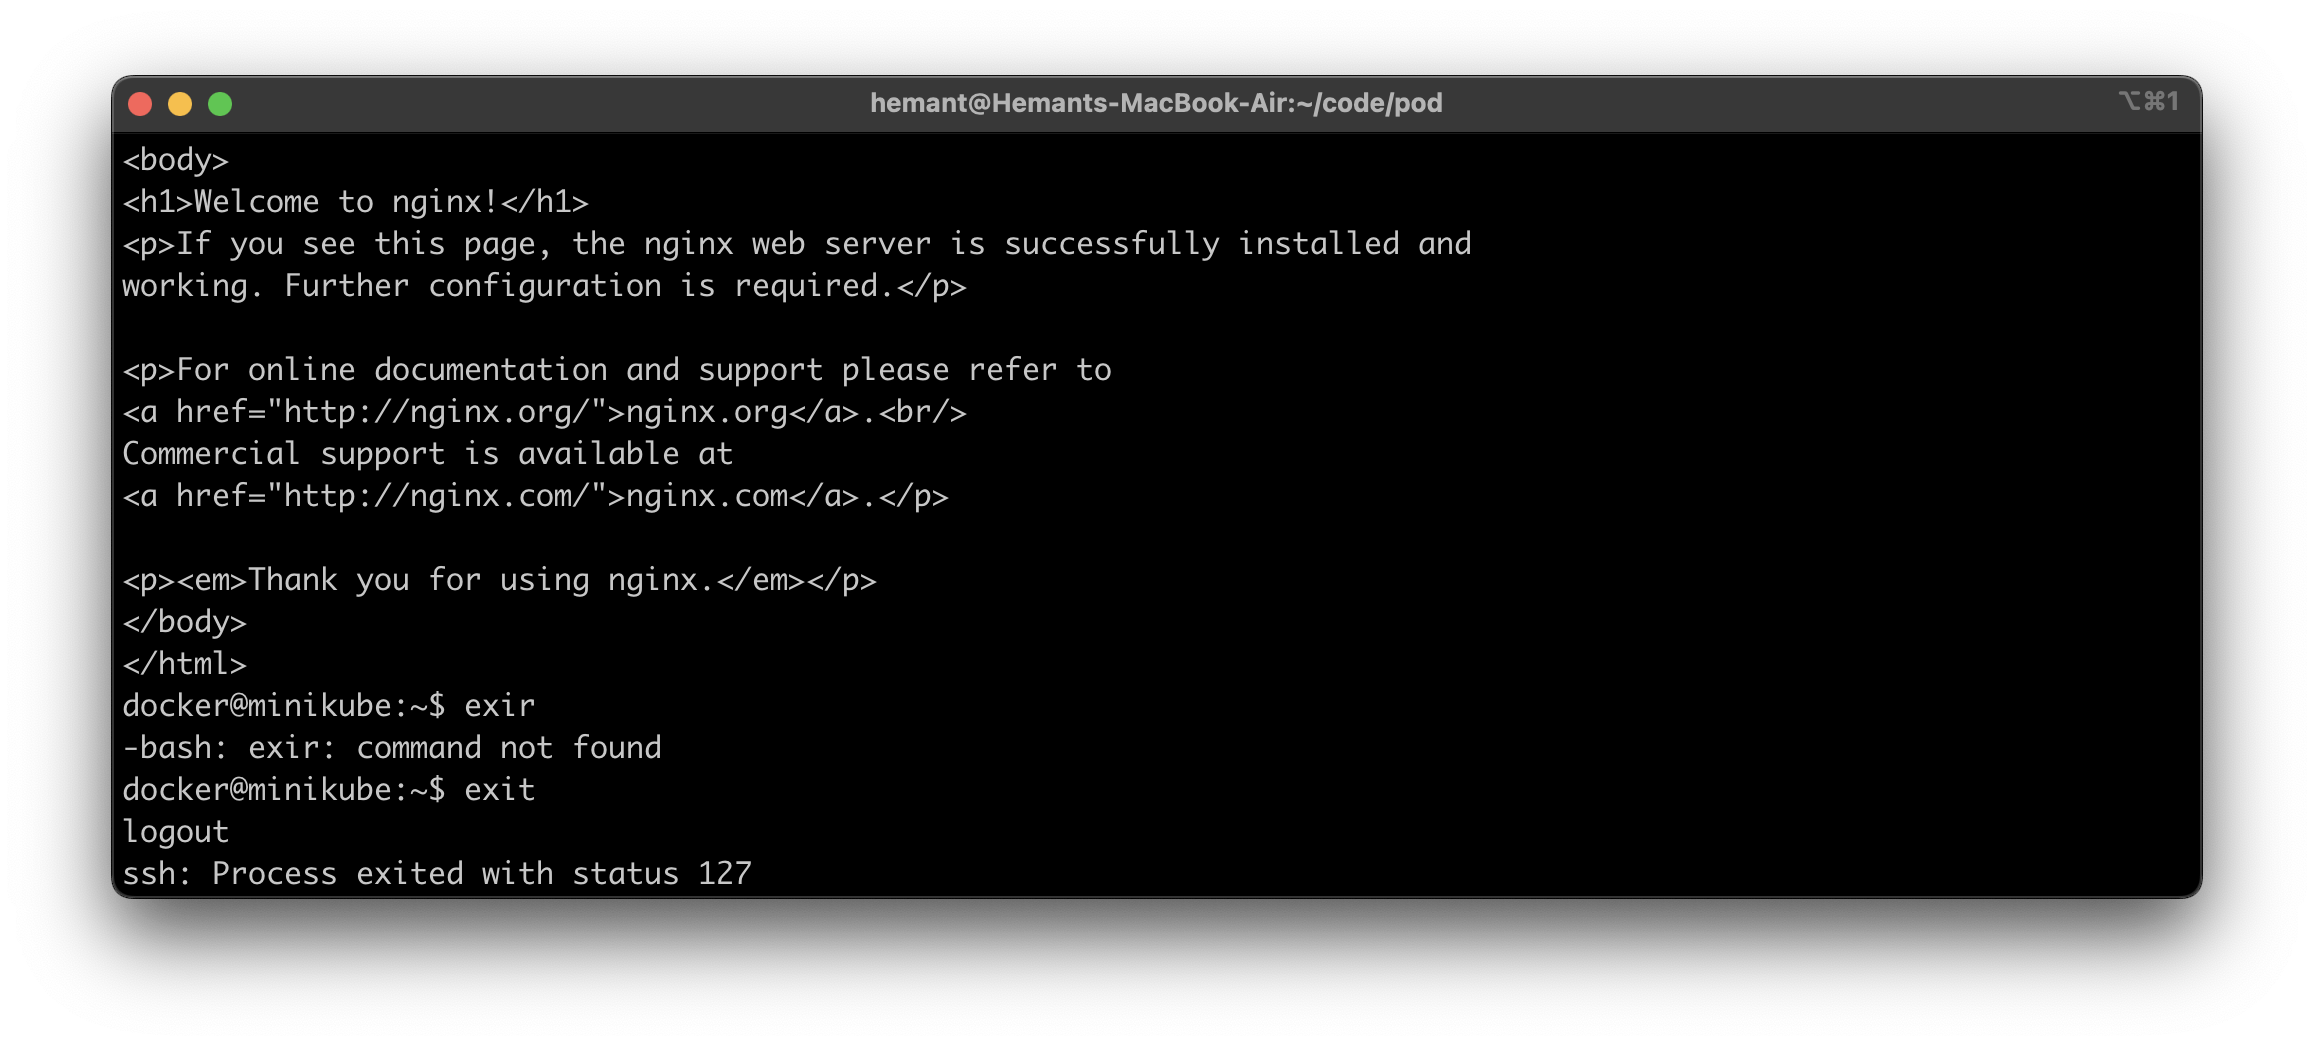
To run a pod use this command
minikube sshandcurl your-pod-ip
now pod is running
Done, Please feel free to correct me if you notice any errors. 😊